Finalizing
Validation Reports
Validator Fundamentals — Module 4 of 4
Click to start
Learning objectives
“As a validator who has logged validation tests with the ValidMind Library to the ValidMind Platform, I want to refine my validation report, submit my validation report for approval, and track artifact (finding) resolution and other updates.”
This final module is part of a four-part series:
Validator Fundamentals
Module 4 — Contents
First, let’s make sure you can log in to ValidMind.
Training is interactive — you explore ValidMind live. Try it!
→ , ↓ , SPACE , N — next slide ← , ↑ , P , H — previous slide ? — all keyboard shortcuts
Before you begin
To continue, you need to have been onboarded onto ValidMind Academy with the Validator role and completed the first three modules of this course:
- Log in to check your access:
Be sure to return to this page afterwards.
- After you successfully log in, refresh the page to connect this training module up to the ValidMind Platform:
Section 1
Refine validation report
Make qualitative edits
(Scroll down for the full instructions.)
Try it live on the next page.
From the Inventory in the ValidMind Platform, go to the model you connected to earlier.
In the left sidebar that appears for your model, click Validation under Documents.
Click on 1. Executive Summary to expand and add content to that section.
Hover your mouse over the space where you want your new block to go until a horizontal line with a sign appears that indicates you can insert a new block:

After adding the block to your validation report, generate a content draft with AI using the content editing toolbar:
Click in the content editing toolbar and select (Generate Text with AI).
Enter a custom prompt and click Send, or click Generate Content to compose a draft for review.
Review the draft composed by the ValidMind AI Content Builder for accuracy and relevance, then:
- Click Insert to document to add the draft into your content block.
- Or, submit a different prompt in the dialogue box and click Send to regenerate a different draft.
After you insert the AI-generated draft, click on the text box to make the necessary edits and adjustments to your copy, ensure that content is in compliance with the quality guidelines outlined by your organization.
You can also use the content editing toolbar to revise the description of test results to explain the changes made to the raw data and the reasons behind them.
For example:
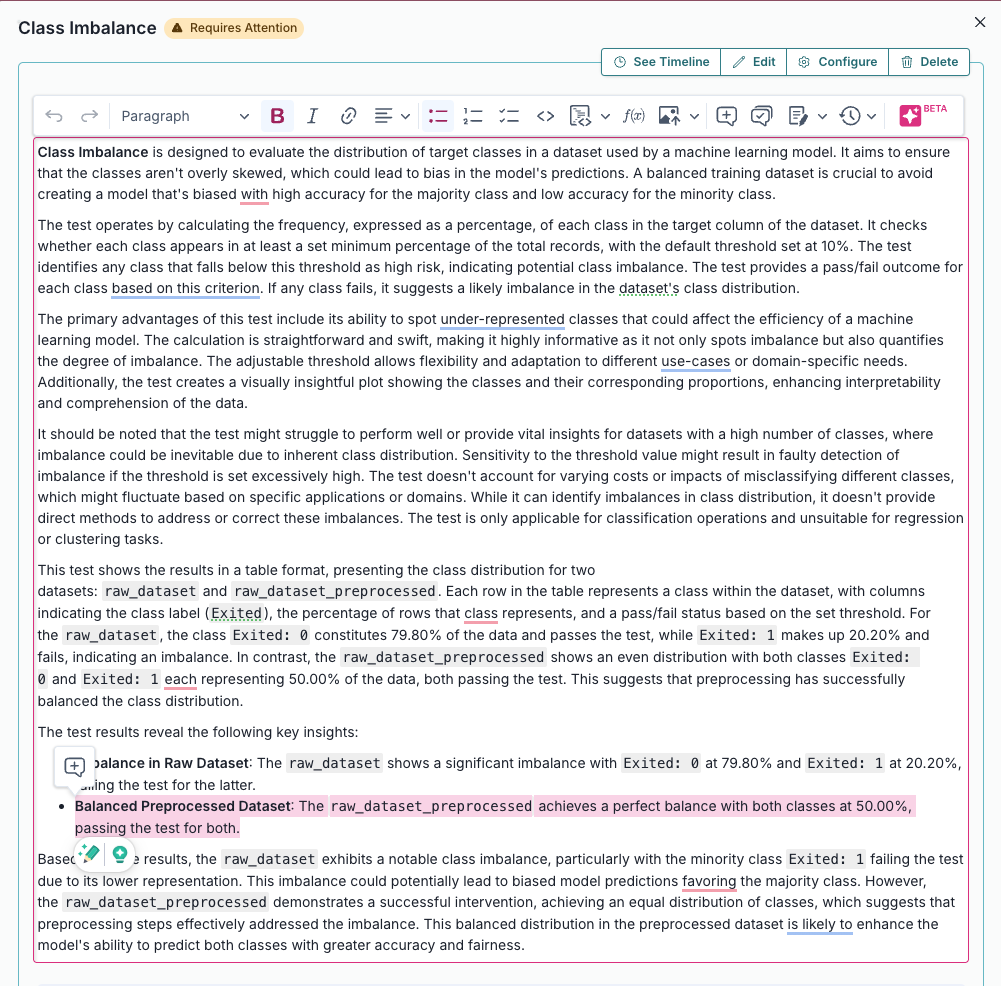
Within your validation report, click on 2.2.1. Data Quality to expand that section and locate the linked Class Imbalance Assessment evidence.
Click See evidence details to review the LLM-generated description that summarizes the test results, that confirm that our final preprocessed dataset actually passes our test.
- Edit the description for our individually inserted
ClassImbalance:raw_dataset_preprocessedtest:
Add & edit content blocks
- Select the name of your model you registered for this course to open up the model details page.
- On the left sidebar that appears for your model, click Validation under Documents.
- Click on 1. Executive Summary to add and edit a content block.
- Click on 2.2.1. Data Quality to edit the description for the linked Class Imbalance Assessment test results.
Automatically map & assess evidence
How does automatic evidence mapping and assessment work?
Validation reports require you to link supporting evidence to each guideline and write compliance assessments, a process that can be time-consuming when done manually across dozens of guidelines.
Scans all available evidence from developers and validators, then suggests which items are relevant to each guideline. Instead of searching through evidence blocks yourself, you review AI-suggested matches and approve the ones that apply. Each suggestion includes a relevance score and explanation so you can make informed decisions.
Analyzes the linked evidence for a guideline and drafts a structured compliance assessment. The generated assessment includes a compliance conclusion, specific observations about gaps or issues, and a technical review of what the evidence demonstrates. You review and approve the draft, and then make edits if needed — saving time while maintaining control over the final content.
Both features are designed to accelerate validation without replacing your judgment. You always review and approve suggestions before they become part of the report.
Automatically map evidence
(Scroll down for the full instructions.)
Try it live on the next page.
Map Evidence uses AI to suggest relevant evidence for each validation guideline, helping you find and link supporting documentation from both developers and validators.
In the left sidebar, click Inventory.
Select a record or find your record by applying a filter or searching for it.
In the left sidebar that appears for your record, click Validation under Documents.
You can map evidence at three levels:
Click Map Evidence in the right sidebar to expand the mapping panel for the entire report.
Sections include subsections with guidelines, and a risk assessment summary at the top of the page.
- Click on a section of the validation report to expand that section.
- Click Map Evidence at the top of the page to open the mapping panel for that section.
Guidelines are organized into subsections under a parent section.
- Click on a section of the validation report to expand that section.
- In any subsection, click Map Evidence to open the mapping panel for that guideline.
Configure the mapping options:
- Toggle the evidence type toggle to include evidence from the selected types:
- Developer Evidence — Include evidence logged on the Development document associated with the record.
- Validator Evidence — Include evidence logged on the current validation report.
- Adjust the relevance threshold slider — lower values return more results while higher values show only the most relevant matches.
- Toggle the evidence type toggle to include evidence from the selected types:
Click Map Evidence to start the mapping.
If this is your first time running Map Evidence, review the information presented to you explaining the mapping process, then click Map Evidence to run the mapping.
When mapping is complete, the # of evidence items to review is displayed. Review the evidence items and approve or reject the suggestions as needed.
Review and approve mapped evidence
After running Map Evidence, you can review and approve suggestions at four levels:
If you have run mapping for the entire report, you can review and approve suggestions at the entire report level.
The Map Evidence panel in the right sidebar for your validation report shows how many items need review across the entire report — click to expand the panel if it is collapsed:
- Select Approve All to link all suggested evidence across all guidelines, or Reject All to dismiss all suggestions.
- Click into any section of the report with approved mapped evidence to confirm that any approved evidence appears in the Evidence panel for guidelines as expected.
- To re-run mapping with different settings, click Remap Evidence.
- (Optional) Adjust the relevance threshold or change which evidence types to include, then generate new suggestions.
Sections include subsections with guidelines, and a risk assessment summary at the top of the page. If you have run mapping for an entire section, you can review and approve suggestions at the section level:
Click on a section of the validation report to expand that section.
Click Map Evidence at the top of the page to open the mapping panel for that section:
- Select Approve All to link all suggested evidence for guidelines in that section, or Reject All to dismiss all section suggestions.
- Confirm that any approved evidence appears in the Evidence panels for the guidelines in that section as expected.
- To re-run mapping with different settings, click Remap Evidence.
- (Optional) Adjust the relevance threshold or change which evidence types to include, then generate new suggestions.
- Select Approve All to link all suggested evidence for guidelines in that section, or Reject All to dismiss all section suggestions.
Guidelines are organized into subsections under a parent section. If you have run mapping for an individual guideline, you can review and approve suggestions at the guideline level:
Click on a section of the validation report to expand that section.
In any subsection, click Map Evidence to open the mapping panel for that guideline:
- Select Approve All to link all suggested evidence for that guideline, or Reject All to dismiss all guideline suggestions.
- Confirm that any approved evidence appears in the Evidence panel for that guideline as expected.
- To re-run mapping with different settings, click Remap Evidence.
- (Optional) Adjust the relevance threshold or change which evidence types to include, then generate new suggestions.
- Select Approve All to link all suggested evidence for that guideline, or Reject All to dismiss all guideline suggestions.
If you have run mapping at any level, you can review and approve individual suggestions at the individual suggestion level:
Click on a section of the validation report to expand that section.
In any subsection, click Evidence to expand the evidence panel for that guideline.
Review individual evidence suggestions on the Developer Evidence or Validator Evidence tabs:
- Each item shows the evidence block name and a relevance score.
- Click See Relevance Analysis to view why the evidence was suggested.
- Click Approve to link an individual item to the guideline.
- Click Reject to dismiss an individual suggestion.
Confirm that any approved evidence appears in the Evidence panel for that guideline as expected.
Map evidence to a guideline
Please note that test results and content blocks must be present on your model’s associated default Development document for Developer Evidence to be automatically mapped to your validation report.
- Select the name of your model you registered for this course to open up the model details page.
- On the left sidebar that appears for your model, click Validation under Documents.
- Click on 2.2.2. Model Performance to expand that section.
- Under the Model Performance Metrics guideline, locate Evidence then click Map Evidence.
- Configure the mapping options, then click Map Evidence to run the AI mapping.
- Review and approve the mapped evidence.
Automatically assess evidence
(Scroll down for the full instructions.)
Try it live on the next page.
Assess Evidence uses AI to analyze the linked evidence and generate a structured compliance assessment, identifying potential risks and compliance gaps.
In the left sidebar, click Inventory.
Select a record or find your record by applying a filter or searching for it.
In the left sidebar that appears for your record, click Validation under Documents.
You can assess evidence for compliance at three levels:
Click Assess Evidence in the right sidebar to expand the evidence assessment panel for the entire report.
Sections include subsections with guidelines, and a risk assessment summary at the top of the page.
- Click on a section of the validation report to expand that section.
- Click Assess Evidence at the top of the page to open the evidence assessment panel for that section.
Guidelines are organized into subsections under a parent section.
- Click on a section of the validation report to expand that section.
- In any subsection, click Assess Evidence to open the evidence assessment panel for that guideline.
Click Assess Evidence to run an analysis on the linked evidence and generate an Evidence Assessment containing:
- Guideline Assessment — A compliance conclusion indicating whether the guideline requirements are fully met, partially met, or not met, with an explanation of the evidence quality.
- Validation Observations — Specific findings about gaps or issues in the evidence, with each observation covering a single concern and suggesting actions for developers.
- Evidence Review — A detailed analysis of what the evidence demonstrates, including references to specific test outputs, documentation, and any limitations.
If this is your first time running Assess Evidence, review the information presented to you explaining the assessment process, then click Assess Evidence to run the assessment.
When evidence assessment is complete, the # of assessment items to review is displayed. Review the assessment items and approve or reject the suggestions as needed.
Review and approve evidence assessments
After running Assess Evidence, you can review and approve assessments at three levels:
If you have run evidence assessment for the entire report, you can review and approve suggestions at the entire report level.
The Assess Evidence panel in the right sidebar for your validation report shows how many items need review across the entire report — click to expand the panel if it is collapsed:
- Select Approve All to link all suggested assessments across all guidelines, or Reject All to dismiss all suggestions.
- Click into any section of the report with approved assessments to confirm that any approved assessments appear in the Evidence Assessment panel for guidelines as expected.
- To re-run the assessment, click Reassess Evidence.
Sections include subsections with guidelines, and a risk assessment summary at the top of the page. If you have run mapping for an entire section, you can review and approve suggestions at the section level:
Click on a section of the validation report to expand that section.
Click Assess Evidence at the top of the page to open the evidence assessment panel for that section:
- Select Approve All to link all suggested assessments for guidelines in that section, or Reject All to dismiss all section suggestions.
- Confirm that any approved assessments appear in the Evidence Assessment panels for the guidelines in that section as expected.
- To re-run the assessment, click Reassess Evidence.
- Select Approve All to link all suggested assessments for guidelines in that section, or Reject All to dismiss all section suggestions.
Guidelines are organized into subsections under a parent section. If you have run mapping for an individual guideline, you can review and approve suggestions at the guideline level:
Click on a section of the validation report to expand that section.
In any subsection, click Evidence Assessment to expand the evidence assessment panel for that guideline:
- Click Approve to approve the assessment.
- Click Reject to dismiss the assessment.
- To re-run the assessment, click Reassess Evidence.
Assess mapped evidence for compliance
Please note that evidence must already be mapped to be assessed automatically on your validation report.
- Select the name of your model you registered for this course to open up the model details page.
- On the left sidebar that appears for your model, click Validation under Documents.
- Click on 2.2.2. Model Performance to expand that section.
- Under the Model Performance Metrics guideline, click Assess Evidence under the Evidence Assessment panel.
- Review and approve the evidence assessment.
Manage artifacts
Add more artifacts
(Scroll down for the full instructions.)
Try it live on the next pages.
In the left sidebar, click Inventory.
Select a record or find your record by applying a filter or searching for it.
Add additional artifacts from your validation report, or via during your review of documentation:
- Always review AI-generated validation issues before approving them. The suggestions are based on patterns in your risk assessment notes and may need adjustment to accurately reflect your findings.
- This feature requires AI capabilities to be enabled for your organization. Contact an administrator if you cannot access the Suggest Validation Issues interface.
You can of course log artifacts manually on your validation report, but you can also use AI to automatically suggest validation issues based on the gaps identified in your assessment:
In the left sidebar that appears for your record, click Validation under Documents.
In the Artifacts section under your evidence, click Suggest Validation Issues.
Click Suggest Validation Issues to have ValidMind analyze your risk assessment notes along with the guideline context and identify any gaps that warrant validation issues.
Review the suggested validation issues. Each suggestion includes:
- A proposed title and description outlining the issue
- A preliminary severity level based on the identified gap
- A proposed remediation plan
Click See more on each suggested issue to expand for more details.
Approve, reject, or regenerate the suggested validation issues:
Approve/reject individual issues
Under each individual issue:
- Click Approve to create the validation issue and link it to your report.
- Click Reject to reject the suggestion if it doesn’t apply.
Approve/reject all issues
Click Suggest Validation Issues # and select:
- Approve All to approve all suggested issues at once.
- Reject All to reject all suggested issues at once.
Regenerate new suggestions
Click Suggest Validation Issues # and select Regenerate Issues.
After approving a validation issue, you can further customize it by clicking on the issue to edit fields such as owner, due date, and status.
Along with adding artifacts via validation reports, you can also add artifacts during your review of documentation:
In the left sidebar that appears for your record, click Development under Documents.
On your record’s documentation page, click Add Artifact.
Select the artifact type you want to add:
- Validation Issue
- Policy Exception
- Limitation
On the modal that opens, provide information for your artifact.
When you are done, click Add {Artifact Type} where
{Artifact Type}is the artifact type you want to add to submit the artifact.Once created, you can then upload attachments to your artifact.
Autogenerate validation issues
- Select the name of your model you registered for this course to open up the model details page.
- On the left sidebar that appears for your model, click Validation under Documents.
- Click on 2.2.2. Model Performance to expand that section.
- Under the Model Performance Metrics guideline, locate Artifacts then click Suggest Validation Issues.
- Approve or reject any suggested validation issues.
Add an artifact on documentation
- Select the name of your model you registered for this course to open up the model details page.
- On the left sidebar that appears for your model, click Development under Documents.
- Click Add Artifact to add an artifact from the overview.
Track issue resolution
(Scroll down for the full instructions.)
Try it live on the next pages.
As you prepare your report, review open or past due artifacts, close resolved ones, or add a mitigation plan:
In the left sidebar, click Inventory.
Select a record or find your record by applying a filter or searching for it.
Track resolution of validation issues
In the left sidebar that appears for your record, click Validation Issues to view a list of validation issues associated with that record.
Go through the open validation issues one-by-one:
If the validation issue has been addressed —
- Add any final comments to assess how the issue was resolved.
- Under Status, select
Closed.
If part or all of the validation issue remains to be addressed —
- Assess if the issue identified by the validation issue prevents the record from being approved.
- If a remediation plan is required, enter the details in the Proposed Remediation Plan section of the validation issue.
Track open issues until all validation issues are resolved or a remediation plan is in place for post-approval issues.
Track resolution of other artifact types
In the left sidebar that appears for your record, click Artifacts to view lists of other artifact types associated with that record.
Select an artifact type for a list of that artifact type:
- Policy Exception
- Limitation
Go through the open artifacts one-by-one:
If the artifact has been addressed —
- Add any final comments to assess how the issue was resolved.
- Under Status, select
Closed.
If part or all of the artifact remains to be addressed —
- Assess if the issue identified by the artifact prevents the record from being approved.
- Add comments indicating next required steps.
Track open artifacts until all artifacts are resolved or plans are in place for post-approval issues.
Along with model-specific artifacts, you can also view and filter a list of artifacts across all models within the ValidMind Platform:
View all validation issues
To view a list of validation issues across all records:
In the left sidebar, click Validation Issues.
Filter this list to include only validation issues you want to see, or toggle visibilty for column headers.
Click on any validation issue for more information, including the proposed remediation plan and any supporting attachments.
Attachments are listed with the following information:
- Filename
- Icon representing file type
- Date uploaded
- The user who uploaded the file
- File size
- Notes
Click on the attachment to view or download the file.
View all other artifacts
To view lists of other artifact types across all records:
In the left sidebar, click Artifacts.
Select an artifact type to view from the tabs:
- Policy Exception
- Limitation
In the page that opens is a list of all artifacts for that type.
Filter this list to include only artifacts you want to see, or toggle visibilty for column headers.
Click on any artifact for more information.
Update your validation issue
- Select the name of your model you registered for this course to open up the model details page.
- In the left sidebar that appears for your model, click Validation Issues.
- Select the validation issue you logged during this course, and make some changes to any of the fields.
- When you are finished editing, set the validation issue Status to
Closed.
Submit report
for approval
Assigning compliance assessments
(Scroll down for the full instructions.)
Assessment options available for selection depend on configuration for individual validation report templates.
Your organization can customize these options to match its own assessment framework, or choose to remove them from templates entirely.
Try it live on the next page.
After you have mapped and assessed available evidence, and generated or attached relevant artifacts, assign compliance assessments to each subsection of your validation report:
In the left sidebar, click Inventory.
Select a record or find your record by applying a filter or searching for it.
In the left sidebar that appears for your record, click Validation under Documents.
Expand any subsection of the validation report you have attached evidence and artifacts for.
Under Guideline, click Select a value for this guideline to choose one of the available Assessment options.
At the top of the page for that subsection, confirm that the compliance summary shown provides an accurate overview for current qualitative and quantitative risk assessments for that subsection:
![A screenshot of the risk assessment compliance summary]()
Risk assessment compliance summary

Assign your compliance assessments
- Select the name of your model you registered for this course to open up the model details page.
- On the left sidebar that appears for your model, click Validation under Documents.
- Locate the Data Preparation section and click on 2.2.2. Model Performance to assign the compliance assessment for the Model Performance Metrics guideline.
ValidMind Document Checker
The ValidMind Document Checker is a compliance tool that reviews documents against a selected regulatory standard. Use the Document Checker to identify gaps, generate actionable recommendations, and focus your efforts on areas that require attention. The Document Checker uses a structured checklist to:
- Assess whether required information or evidence is clearly documented or attached.
- Identify missing or weak areas in the document.
- Offer guidance on how to improve clarity, completeness, and compliance.
- Ensure consistency with regulatory expectations for risk and governance.
Learn how to use the Document Checker to review validation reports on the next page.
Use the Document Checker
(Scroll down for the full instructions.)
Try it live on the next page.
In the left sidebar, click Inventory.
Select a model or find your model by applying a filter or searching for it.
In the left sidebar that appears for your model, click Documents and select Validation.
Locate Check Document on the right and click to expand the menu, then click Check Document.
In the Document Checker modal, select a Regulation or Policy and an associated Assessment from the drop-down menus to check your document against:
![A screenshot showing the Regulation or Policy and Assessment dropdowns in the Document Checker]()
Example Regulation or Policy and Assessment selected to check a document against A list of regulation-based questions appears for your review.
Scroll to the bottom and click Check Validation Document.

The ValidMind Document Checker analyzes your report, identifies gaps, and generates recommendations for specific questions that you review in the next step.
- After the Document Checker has completed its analysis, expand individual questions or click Expand All to look through the observations:
Gap Identified — A question that is not addressed and requires attention.
Partial Gap — A question that is partially addressed and requires attention.
No Significant Gaps — A question that is fully addressed.
Review questions that require attention. Each question includes:
- Observation — An analysis of how the report currently addresses the question
- Recommendation — If suggested, guidance on how to revise the report to better address the question
Use the feedback provided by the ValidMind Document Checker to review the appropriate sections of your report and decide what revisions should be made. Or, if you have run the Document Checker before and were just checking that all report issues have been addressed, submit your report for review.
To export the results of the Document Checker to a .pdf (Portable Document Format) file for usage outside of the ValidMind Platform, click Export All.
Check your validation report
- Select the name of your model you registered for this course to open up the model details page.
- On the left sidebar that appears for your model, click Validation under Documents.
- Locate Check Document on the right and click to expand the menu, then click Check Document.
- Select a Regulation and an associated Assessment from the drop-down menus to check your report against.
- Scroll to the bottom and click Check Validation Document.
- After the Document Checker has completed its analysis, expand individual questions or click Expand All to look through the observations.
Work with workflows
(Scroll down for the full instructions.)
Try it live on the next page.
Depending on the configuration of your workflows, you may or may not be able to move a record into another workflow state as actions can be gated to only users of certain roles.
When all the actions that can be performed by your role are completed for that record at that stage of the workflow, actions will disappear from your view.
When you’re ready, verify your workflow’s status, and then submit your documents for review or approval.
Workflows are configured by an administrator in advance. When transitioning a workflow, verify that the workflow steps reflect your organization’s requirements.
To review details for workflows currently active:
On records
In the left sidebar, click Inventory.
Select a record or find your record by applying a filter or searching for it.
On the landing page of your record, locate the Active Workflows section.
Click on the name of any active workflow to review that specific workflow’s details.
Click on the tab you would like to review:
- Details — Name and description (if present) of the workflow, the workflow’s status and progress (if applicable), when it was created, and when it was started.
- Activity — History of updates to the workflow on that record, including notes submitted during transitions.
- Artifacts — Artifacts for that record created within the duration of that workflow’s runtime.
- Workflow — Overview of the entire workflow. The current workflow step is highlighted on this view.
On artifacts
On the details page of your artifact, locate the Active Workflows section.
Click on the name of any active workflow to review that specific workflow’s details.
Click on the tab you would like to review:
- Details — Name and description (if present) of the workflow, the workflow’s status and progress (if applicable), when it was created, and when it was started.
- Activity — History of updates to the workflow on that artifact, including notes submitted during transitions.
- Workflow — Overview of the entire workflow. The current workflow step is highlighted on this view.
To transition a workflow into next steps:
On records
In the left sidebar, click Inventory.
Select a record or find your record by applying a filter or searching for it.
On the landing page of your record, locate the Active Workflows section and the workflow you’d like to transition.
If an action is available to your role, you’ll see it listed under that workflow:
- Click to open up the transition panel for your selected action. This arrow will be followed by the action name.
- Enter your Notes and/or any other additional inventory fields then click {action} where
actionis the name of your custom user action. To save a working copy of the entered information without transitioning the workflow into its next state, click Save.
Click {action} where
actionis the name of your custom user action to submit the entered information and transition the workflow into its next state.
On artifacts
On the details page of your artifact, locate the Active Workflows section.
If an action is available to your role, you’ll see it listed under that workflow:
- Click to open up the transition panel for your selected action. This arrow will be followed by the action name.
- Enter your Notes and/or any other additional inventory fields then click {action} where
actionis the name of your custom user action. To save a working copy of the entered information without transitioning the workflow into its next state, click Save.
Click {action} where
actionis the name of your custom user action to submit the entered information and transition the workflow into its next state.
While your record stages and workflows states are custom to your organization, some examples are:
- To submit validation reports for review and approval — Click Ready for Review to indicate that you have completed your initial validation report, fill in the mandatory notes, and submit.
- To request revisions to validation reports — Click Request Revision, fill in the mandatory notes to explain the changes that are required, and submit.
- To have your validation report approved — Click Ready for Approval, fill in the mandatory notes, and submit.
Submit for approval
- Select the name of your model you registered for this course to open up the model details page.
- On the landing page of your model, locate the Active Workflows section and the workflow you’d like to transition.
- If an action is available to your role, you’ll see it listed under that workflow:
- Click to open up the transition panel for your selected action. This arrow will be followed by the action name.
- Enter your Notes and any other additional inventory fields then click Submit.
Section 2
Collaborate with others
While working with content blocks, you can comment directly on specific portions of the text.
All users associated with a record, such as developers and validators, will see a notification that a comment has been posted in their Recent Activity feed, accessible via the Dashboard.
Have a question about the record? Collaborate with your developer right in the documentation:
In any text block or test description, select the portion of text you want to comment on, then click the button that appears.
Enter your comment and click Comment.
You can view the comment by clicking the highlighted text. Comments will also appear in the right sidebar.
Click the highlighted text to view the comment thread.
Enter your comment and click Reply.
You can view the comment thread by clicking the highlighted text.
Click the highlighted text portion to view the thread, then click to resolve the thread.
To view the resolved comment thread, click the Comments archive button in the toolbar.
You can view a history of all archived comments in the Comment archive.
To reopen a comment thread, reply to the comment thread in the Comment archive or click the Reopen button in the header of that comment thread.
Comment on a text block
- Select the name of your model you registered for this course to open up the model details page.
- On the left sidebar that appears for your model, click Validation under Documents.
- In the content block you added earlier: Post a comment, reply to it, and then resolve the thread.
Track activity
View record activity
The record Activity page shows a history of activities for the selected inventory record, including actions performed by users in your organization, activity from automated workflows, and updates generated via the ValidMind Library, such as:
- Fields updated
- Stage transitions
- Updates to documents: documentation, validation reports, ongoing monitoring reports, or custom documents
- Test results or metrics added via the library
- Artifacts added, updated, or removed
- User comment creation and replies on documents
- Stakeholders added or removed
- Workflow activity
To view record activity:
In the left sidebar, click Inventory.
Select the type of
{Record}you want to view activity for by clicking on {Record} Inventory.Select a record or find your record by applying a filter or searching for it.
In the expanded sidebar that appears for your record, click Activity.
Review model activity
- Select the name of your model you registered for this course to open up the record details page.
- In the left sidebar that appears for your model, click Activity.
- Confirm activity logged on the model reflects your activities from this training course.
- (Optional) Filter the activity by category or specific values to narrow down results.
View analytics
Welcome to Analytics
Under analytics, you can find executive summaries, track information on records (models), artifacts, and more.
For example:
- Select Validation Issues to review reports on validation issues.
- Click into any widget to review the validation issues reported by that widget.
In summary
Finalizing validation reports
Want to learn more? Find your next learning resource on ValidMind Academy.
In this final module, you learned how to:
There is more that ValidMind can do to help you validate records, from using your own template to code samples you can adapt for your own use case:

ValidMind Academy | Home