# Make sure the ValidMind Library is installed

%pip install -q validmind

# Load your model identifier credentials from an `.env` file

%load_ext dotenv
%dotenv .env

# Or replace with your code snippet

import validmind as vm

vm.init(
    # api_host="...",
    # api_key="...",
    # api_secret="...",
    # model="...",
    document="documentation",
)ValidMind for model development 3 — Integrate custom tests
Learn how to use ValidMind for your end-to-end model documentation process with our series of four introductory notebooks. In this third notebook, supplement ValidMind tests with your own and include them as additional evidence in your documentation.
This notebook assumes that you already have a repository of custom made tests considered critical to include in your documentation. A custom test is any function that takes a set of inputs and parameters as arguments and returns one or more outputs:
- The function can be as simple or as complex as you need it to be — it can use external libraries, make API calls, or do anything else that you can do in Python.
- The only requirement is that the function signature and return values can be "understood" and handled by the ValidMind Library. As such, custom tests offer added flexibility by extending the default tests provided by ValidMind, enabling you to document any type of model or use case.
For a more in-depth introduction to custom tests, refer to our Implement custom tests notebook.
Learn by doing
Our course tailor-made for developers new to ValidMind combines this series of notebooks with more a more in-depth introduction to the ValidMind Platform — Developer Fundamentals
Our course tailor-made for developers new to ValidMind combines this series of notebooks with more a more in-depth introduction to the ValidMind Platform — Developer Fundamentals
Prerequisites
In order to integrate custom tests with your model documentation with this notebook, you'll need to first have:
Need help with the above steps?
Refer to the first two notebooks in this series:
Setting up
This section should be quite familiar to you — as we performed the same actions in the previous notebook, 2 — Start the model development process.
Initialize the ValidMind Library
As usual, let's first connect up the ValidMind Library to our model we previously registered in the ValidMind Platform:
- On the left sidebar that appears for your model, select Getting Started and select
Developmentfrom the DOCUMENT drop-down menu. - Click Copy snippet to clipboard.
- Next, load your model identifier credentials from an
.envfile or replace the placeholder with your own code snippet:
Import sample dataset
Next, we'll import the same public Bank Customer Churn Prediction dataset from Kaggle we used in the last notebook so that we have something to work with:
from validmind.datasets.classification import customer_churn as demo_dataset

print(
    f"Loaded demo dataset with: \n\n\t• Target column: '{demo_dataset.target_column}' \n\t• Class labels: {demo_dataset.class_labels}"
)

raw_df = demo_dataset.load_data()
We'll apply a simple rebalancing technique to the dataset before continuing:
import pandas as pd

raw_copy_df = raw_df.sample(frac=1)  # Create a copy of the raw dataset

# Create a balanced dataset with the same number of exited and not exited customers
exited_df = raw_copy_df.loc[raw_copy_df["Exited"] == 1]
not_exited_df = raw_copy_df.loc[raw_copy_df["Exited"] == 0].sample(n=exited_df.shape[0])

balanced_raw_df = pd.concat([exited_df, not_exited_df])
balanced_raw_df = balanced_raw_df.sample(frac=1, random_state=42)Train the model
We'll then use ValidMind tests to train a simple logistic regression model on our prepared dataset:
# First encode the categorical features in our dataset with the highly correlated features removed
balanced_raw_no_age_df = pd.get_dummies(
    balanced_raw_no_age_df, columns=["Geography", "Gender"], drop_first=True
)
balanced_raw_no_age_df.head()
# Split the processed dataset into train and test
from sklearn.model_selection import train_test_split
train_df, test_df = train_test_split(balanced_raw_no_age_df, test_size=0.20)
X_train = train_df.drop("Exited", axis=1)
y_train = train_df["Exited"]
X_test = test_df.drop("Exited", axis=1)
y_test = test_df["Exited"]from sklearn.linear_model import LogisticRegression
# Logistic Regression grid params
log_reg_params = {
"penalty": ["l1", "l2"],
"C": [0.001, 0.01, 0.1, 1, 10, 100, 1000],
"solver": ["liblinear"],
}
# Grid search for Logistic Regression
from sklearn.model_selection import GridSearchCV
grid_log_reg = GridSearchCV(LogisticRegression(), log_reg_params)
grid_log_reg.fit(X_train, y_train)
# Logistic Regression best estimator
log_reg = grid_log_reg.best_estimator_Initialize the ValidMind objects
Let's initialize the ValidMind Dataset and Model objects in preparation for assigning model predictions to each dataset:
# Initialize the datasets into their own dataset objects
vm_train_ds = vm.init_dataset(
    input_id="train_dataset_final",
    dataset=train_df,
    target_column="Exited",
)

vm_test_ds = vm.init_dataset(
    input_id="test_dataset_final",
    dataset=test_df,
    target_column="Exited",
)

# Initialize a model object
vm_model = vm.init_model(log_reg, input_id="log_reg_model_v1")
Assign predictions
Once the model is registered, we'll assign predictions to the training and test datasets:
vm_train_ds.assign_predictions(model=vm_model)
vm_test_ds.assign_predictions(model=vm_model)
Implementing a custom inline test
With the set up out of the way, let's implement a custom inline test that calculates the confusion matrix for a binary classification model.
- An inline test refers to a test written and executed within the same environment as the code being tested — in this case, right in this Jupyter Notebook — without requiring a separate test file or framework.
- You'll note that the custom test function is just a regular Python function that can include and require any Python library as you see fit.
Create a confusion matrix plot
Let's first create a confusion matrix plot using the confusion_matrix function from the sklearn.metrics module:
import matplotlib.pyplot as plt
from sklearn import metrics

# Get the predicted classes
y_pred = log_reg.predict(vm_test_ds.x)

confusion_matrix = metrics.confusion_matrix(y_test, y_pred)

cm_display = metrics.ConfusionMatrixDisplay(
    confusion_matrix=confusion_matrix, display_labels=[False, True]
)
cm_display.plot()
Next, create a @vm.test wrapper that will allow you to create a reusable test. Note the following changes in the code below:
- The function
confusion_matrixtakes two argumentsdatasetandmodel. This is aVMDatasetandVMModelobject respectively.VMDatasetobjects allow you to access the dataset's true (target) values by accessing the.yattribute.VMDatasetobjects allow you to access the predictions for a given model by accessing the.y_pred()method.
- The function docstring provides a description of what the test does. This will be displayed along with the result in this notebook as well as in the ValidMind Platform.
- The function body calculates the confusion matrix using the
sklearn.metrics.confusion_matrixfunction as we just did above. - The function then returns the
ConfusionMatrixDisplay.figure_object — this is important as the ValidMind Library expects the output of the custom test to be a plot or a table. - The
@vm.testdecorator is doing the work of creating a wrapper around the function that will allow it to be run by the ValidMind Library. It also registers the test so it can be found by the IDmy_custom_tests.ConfusionMatrix.
@vm.test("my_custom_tests.ConfusionMatrix")
def confusion_matrix(dataset, model):
    """The confusion matrix is a table that is often used to describe the performance of a classification model on a set of data for which the true values are known.

    The confusion matrix is a 2x2 table that contains 4 values:

    - True Positive (TP): the number of correct positive predictions
    - True Negative (TN): the number of correct negative predictions
    - False Positive (FP): the number of incorrect positive predictions
    - False Negative (FN): the number of incorrect negative predictions

    The confusion matrix can be used to assess the holistic performance of a classification model by showing the accuracy, precision, recall, and F1 score of the model on a single figure.
    """
    y_true = dataset.y
    y_pred = dataset.y_pred(model=model)

    confusion_matrix = metrics.confusion_matrix(y_true, y_pred)

    cm_display = metrics.ConfusionMatrixDisplay(
        confusion_matrix=confusion_matrix, display_labels=[False, True]
    )
    cm_display.plot()

    plt.close()  # close the plot to avoid displaying it

    return cm_display.figure_  # return the figure object itself
You can now run the newly created custom test on both the training and test datasets using the run_test() function:
# Training dataset
result = vm.tests.run_test(
    "my_custom_tests.ConfusionMatrix:training_dataset",
    inputs={"model": vm_model, "dataset": vm_train_ds},
)
# Test dataset
result = vm.tests.run_test(
"my_custom_tests.ConfusionMatrix:test_dataset",
inputs={"model": vm_model, "dataset": vm_test_ds},
)Add parameters to custom tests
Custom tests can take parameters just like any other function. To demonstrate, let's modify the confusion_matrix function to take an additional parameter normalize that will allow you to normalize the confusion matrix:
@vm.test("my_custom_tests.ConfusionMatrix")
def confusion_matrix(dataset, model, normalize=False):
    """The confusion matrix is a table that is often used to describe the performance of a classification model on a set of data for which the true values are known.

    The confusion matrix is a 2x2 table that contains 4 values:

    - True Positive (TP): the number of correct positive predictions
    - True Negative (TN): the number of correct negative predictions
    - False Positive (FP): the number of incorrect positive predictions
    - False Negative (FN): the number of incorrect negative predictions

    The confusion matrix can be used to assess the holistic performance of a classification model by showing the accuracy, precision, recall, and F1 score of the model on a single figure.
    """
    y_true = dataset.y
    y_pred = dataset.y_pred(model=model)

    if normalize:
        confusion_matrix = metrics.confusion_matrix(y_true, y_pred, normalize="all")
    else:
        confusion_matrix = metrics.confusion_matrix(y_true, y_pred)

    cm_display = metrics.ConfusionMatrixDisplay(
        confusion_matrix=confusion_matrix, display_labels=[False, True]
    )
    cm_display.plot()

    plt.close()  # close the plot to avoid displaying it

    return cm_display.figure_  # return the figure object itself
Pass parameters to custom tests
You can pass parameters to custom tests by providing a dictionary of parameters to the run_test() function.
- The parameters will override any default parameters set in the custom test definition. Note that
datasetandmodelare still passed asinputs. - Since these are
VMDatasetorVMModelinputs, they have a special meaning. - When declaring a
dataset,model,datasetsormodelsargument in a custom test function, the ValidMind Library will expect these get passed asinputstorun_test()orrun_documentation_tests().
Re-running the confusion matrix with normalize=True and our testing dataset looks like this:
# Test dataset with normalize=True
result = vm.tests.run_test(
    "my_custom_tests.ConfusionMatrix:test_dataset_normalized",
    inputs={"model": vm_model, "dataset": vm_test_ds},
    params={"normalize": True}
)
Log the confusion matrix results
As we learned in 2 — Start the model development process under Documenting results > Run and log an individual tests, you can log any result to the ValidMind Platform with the .log() method of the result object, allowing you to then add the result to the documentation.
You can now do the same for the confusion matrix results:
result.log()
Note the output returned indicating that a test-driven block doesn't currently exist in your model's documentation for this particular test ID.
That's expected, as when we run individual tests the results logged need to be manually added to your documentation within the ValidMind Platform.
That's expected, as when we run individual tests the results logged need to be manually added to your documentation within the ValidMind Platform.
Using external test providers
Creating inline custom tests with a function is a great way to customize your model documentation. However, sometimes you may want to reuse the same set of tests across multiple models and share them with others in your organization. In this case, you can create an external custom test provider that will allow you to load custom tests from a local folder or a Git repository.
In this section you will learn how to declare a local filesystem test provider that allows loading tests from a local folder following these high level steps:
- Create a folder of custom tests from existing inline tests (tests that exist in your active Jupyter Notebook)
- Save an inline test to a file
- Define and register a
LocalTestProviderthat points to that folder - Run test provider tests
- Add the test results to your documentation
Create custom tests folder
Let's start by creating a new folder that will contain reusable custom tests from your existing inline tests.
The following code snippet will create a new my_tests directory in the current working directory if it doesn't exist:
tests_folder = "my_tests"

import os

# create tests folder
os.makedirs(tests_folder, exist_ok=True)

# remove existing tests
for f in os.listdir(tests_folder):
    # remove files and pycache
    if f.endswith(".py") or f == "__pycache__":
        os.system(f"rm -rf {tests_folder}/{f}")
After running the command above, confirm that a new my_tests directory was created successfully. For example:
~/notebooks/tutorials/model_development/my_tests/Save an inline test
The @vm.test decorator we used in Implementing a custom inline test above to register one-off custom tests also includes a convenience method on the function object that allows you to simply call <func_name>.save() to save the test to a Python file at a specified path.
While save() will get you started by creating the file and saving the function code with the correct name, it won't automatically include any imports, or other functions or variables, outside of the functions that are needed for the test to run. To solve this, pass in an optional imports argument ensuring necessary imports are added to the file.
The confusion_matrix test requires the following additional imports:
import matplotlib.pyplot as plt
from sklearn import metrics
Let's pass these imports to the save() method to ensure they are included in the file with the following command:
confusion_matrix.save(
    # Save it to the custom tests folder we created
    tests_folder,
    imports=["import matplotlib.pyplot as plt", "from sklearn import metrics"],
)-
# Saved from __main__.confusion_matrix # Original Test ID: my_custom_tests.ConfusionMatrix # New Test ID: <test_provider_namespace>.ConfusionMatrix -
def ConfusionMatrix(dataset, model, normalize=False):
Register a local test provider
Now that your my_tests folder has a sample custom test, let's initialize a test provider that will tell the ValidMind Library where to find your custom tests:
- ValidMind offers out-of-the-box test providers for local tests (tests in a folder) or a Github provider for tests in a Github repository.
- You can also create your own test provider by creating a class that has a
load_testmethod that takes a test ID and returns the test function matching that ID.
Want to learn more about test providers?
An extended introduction to test providers can be found in: Integrate external test providers
An extended introduction to test providers can be found in: Integrate external test providers
Initialize a local test provider
For most use cases, using a LocalTestProvider that allows you to load custom tests from a designated directory should be sufficient.
The most important attribute for a test provider is its namespace. This is a string that will be used to prefix test IDs in model documentation. This allows you to have multiple test providers with tests that can even share the same ID, but are distinguished by their namespace.
Let's go ahead and load the custom tests from our my_tests directory:
from validmind.tests import LocalTestProvider

# initialize the test provider with the tests folder we created earlier
my_test_provider = LocalTestProvider(tests_folder)

vm.tests.register_test_provider(
    namespace="my_test_provider",
    test_provider=my_test_provider,
)
# `my_test_provider.load_test()` will be called for any test ID that starts with `my_test_provider`
# e.g. `my_test_provider.ConfusionMatrix` will look for a function named `ConfusionMatrix` in `my_tests/ConfusionMatrix.py` file
Run test provider tests
Now that we've set up the test provider, we can run any test that's located in the tests folder by using the run_test() method as with any other test:
- For tests that reside in a test provider directory, the test ID will be the
namespacespecified when registering the provider, followed by the path to the test file relative to the tests folder. - For example, the Confusion Matrix test we created earlier will have the test ID
my_test_provider.ConfusionMatrix. You could organize the tests in subfolders, sayclassificationandregression, and the test ID for the Confusion Matrix test would then bemy_test_provider.classification.ConfusionMatrix.
Let's go ahead and re-run the confusion matrix test with our testing dataset by using the test ID my_test_provider.ConfusionMatrix. This should load the test from the test provider and run it as before.
result = vm.tests.run_test(
    "my_test_provider.ConfusionMatrix",
    inputs={"model": vm_model, "dataset": vm_test_ds},
    params={"normalize": True},
)

result.log()
Again, note the output returned indicating that a test-driven block doesn't currently exist in your model's documentation for this particular test ID.
That's expected, as when we run individual tests the results logged need to be manually added to your documentation within the ValidMind Platform.
That's expected, as when we run individual tests the results logged need to be manually added to your documentation within the ValidMind Platform.
Add test results to documentation
With our custom tests run and results logged to the ValidMind Platform, let's head to the model we connected to at the beginning of this notebook and insert our test results into the documentation (Need more help?):
From the Inventory in the ValidMind Platform, go to the model you connected to earlier.
In the left sidebar that appears for your model, click Development under Documents.
Locate the Data Preparation section and click on 3.2. Model Evaluation to expand that section.
Hover under the Pearson Correlation Matrix content block until a horizontal dashed line with a + button appears, indicating that you can insert a new block.

Click + and then select Test-Driven Block under FROM LIBRARY:
- Click on Custom under TEST-DRIVEN in the left sidebar.
- Select the two custom
ConfusionMatrixtests you logged above:
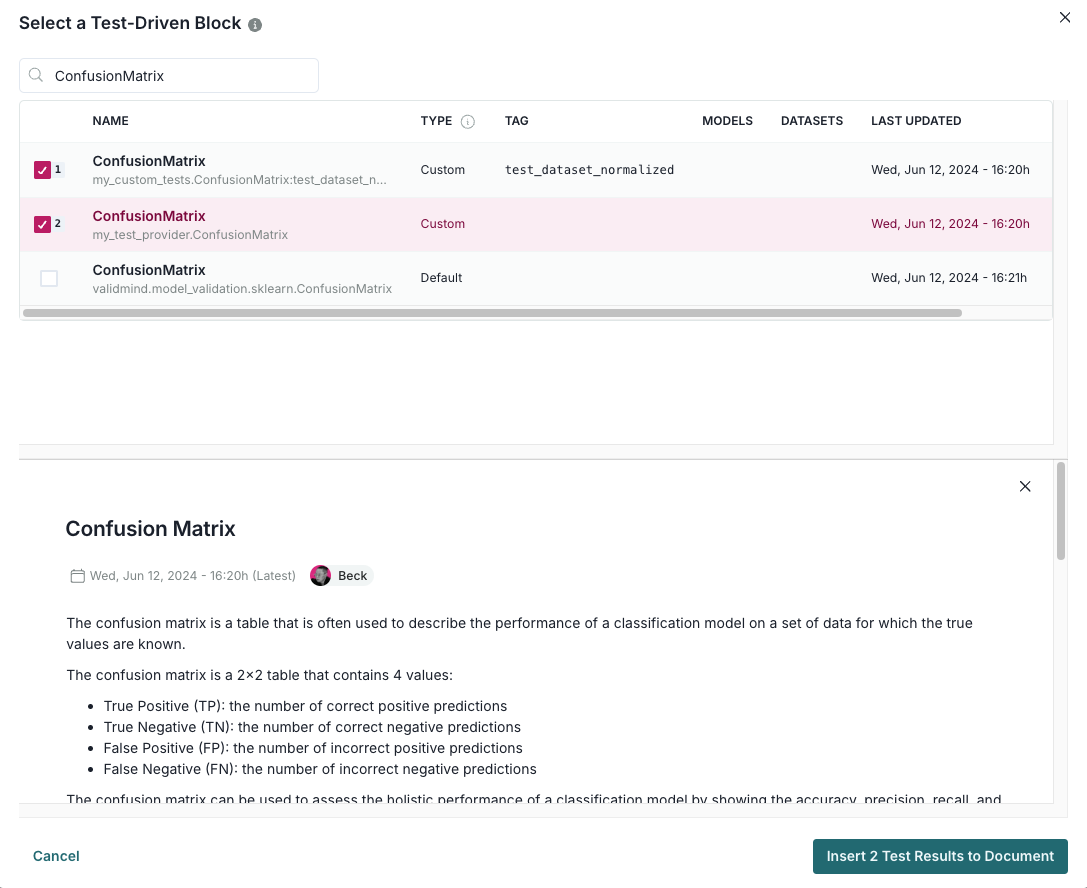
Finally, click Insert 2 Test Results to Document to add the test results to the documentation.
Confirm that the two individual results for the confusion matrix tests have been correctly inserted into section 3.2. Model Evaluation of the documentation.
In summary
In this third notebook, you learned how to:
Next steps
Finalize testing and documentation
Now that you're proficient at using the ValidMind Library to run and log tests, let's put the last pieces in place to prepare our fully documented sample model for review: 4 — Finalize testing and documentation
Copyright © 2023-2026 ValidMind Inc. All rights reserved.
Refer to LICENSE for details.
SPDX-License-Identifier: AGPL-3.0 AND ValidMind Commercial