flowchart LR
    A["**Add attestation template**"] --> B["**Complete required sections**"]
    B --> C["**Optional: Test or manage**"]
Manage attestations
Enable attestation participants to step through the attestation process required by your organization.
The steps required to set up attestation
Setting up attestations involves adding an attestation template and completing the required sections: attestation periods, attestation participants, and questionnaire template. Optionally, you can also set the inventory scope, add attestation fields, start attestation schedules to test the process, and edit or cancel attestation periods.
Prerequisites
Add attestation templates
In the left sidebar, click Settings.
Under Governance, select Attestation Templates.
Click Add Attestation Template.
Enter a Name and Description for the attestation template.
Select the Inventory Record Type this attestation template applies to.
Click Add Attestation Template.
Complete the required sections as described below.
To edit an existing attestation template:
In the left sidebar, click Settings.
Under Governance, select Attestation Templates and then click an attestation template to edit.
Attestation periods are typically scheduled quarterly or annually and should be configured to align with regulatory or internal review cycles:
Click Add Attestation Period.
Enter a Name for the attestation period, such as
Quarterly attestation.Set the Start Date for the attestation period.
Set the End Date when the attestation period ends.
(Optional) Toggle Email Reminders to send reminders to Submitters, Reviewers, and Approvers:
- Days Before End — How many days before the end date to send the reminder.
- Subject — The email subject line.
- Body — The email body with dynamic variables.
Available template variables:
{Recipient Name},{Attestation Name},{Reminder Reason},{Start Date},{End Date},{Schedule Name},{Status Text}.Click Add Period.
When the attestation period begins, the system triggers the process automatically. Attestation participants are then notified via a banner on their dashboard prompting them to complete their attestation tasks.
Assign users and roles responsible for this attestation. Each participant type has a specific responsibility in the attestation workflow:
Under Attestation Participants, select the Submitter from the inventory record stakeholders:
- Record Owner
- Record Developer
- Record Validator
Select the Reviewer from the roles dropdown.
Select the Approver from the roles dropdown.
Click Save.
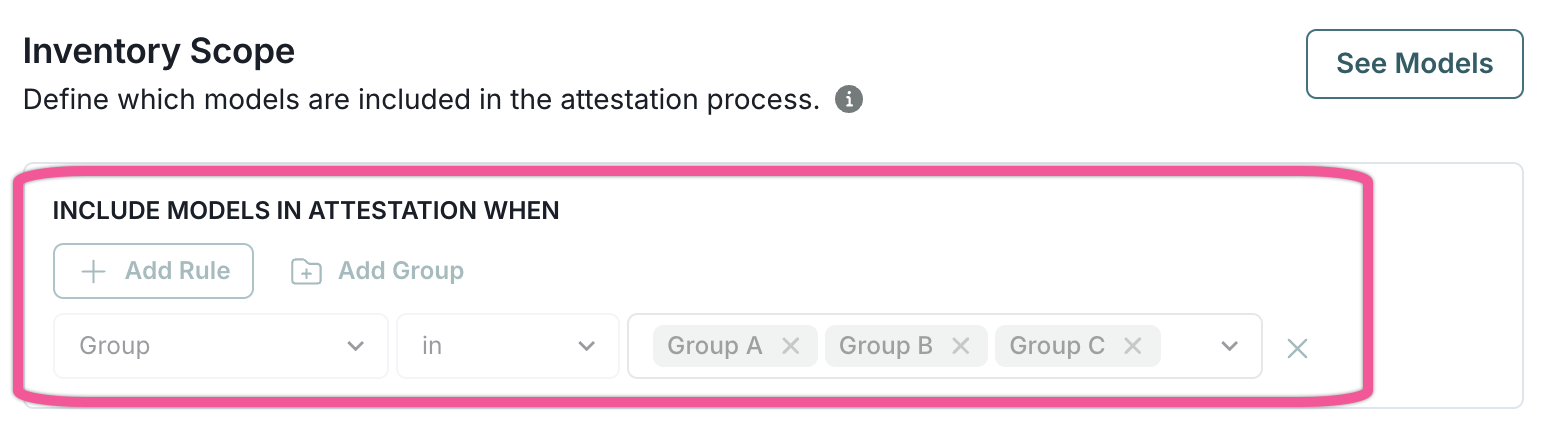
Define which records are included in the attestation process. By default, all records are included. Use filters to narrow the scope based on inventory record fields, stages, or custom attributes.
- Under Inventory Scope, click Add Rule to add a filter condition.
NoneHow do I create effective filters?
Filtering supports simple and complex conditions using AND or OR logic with nested groups. You can filter on both the default fields created by ValidMind and custom fields created by your organization.
Rules
Rules define individual conditions to filter by, such as the business unit or owner.
To add a rule:
Click click Add Rule to add a filter condition.
A filter rule contains three components:

- Field selector
- Dropdown to choose the field type to filter by.
- Operator selector
- Dropdown to select the comparison operator.
- Value editor
- Input area that varies based on the selected field type.
- From the field selector dropdown, select one of:
- From the operator dropdown, select one of:
Available operators update based on the field selector
| Text fields | Date fields | Number fields | Boolean fields | Multi-select fields |
|---|---|---|---|---|
| equals | equals | equals | equals | in |
| not equals | not equals | not equals | not equals | not in |
| contains | before | greater than | is empty | contains |
| begins with | after | less than | is not empty | is empty |
| ends with | between | between | is not empty | |
| is empty | is empty | is empty | ||
| is not empty | is not empty | is not empty |
- From the value editor, enter or select a value based on the field type:
Value input changes based on field selector
- Text
- Text input or text area for longer content
- Date
- Date picker
- Number
- Number input or range slider
- Boolean
- Checkbox
- Select/multi-select
- Dropdown with search
- Entity fields
- Dropdown with search for users or records
(Optional) Add more rules by following the same steps.
Click Apply Filters.
Groups
Groups combine multiple rules that are evaluated together and can be nested one level deep. You use groups for more complex filters, such as Condition A AND (Condition B OR Condition C).
To add a group:
Click Add Group to create a nested group of conditions.
Follow the same steps as in Rules to add one or several conditions to the group.
Click Apply Filters.
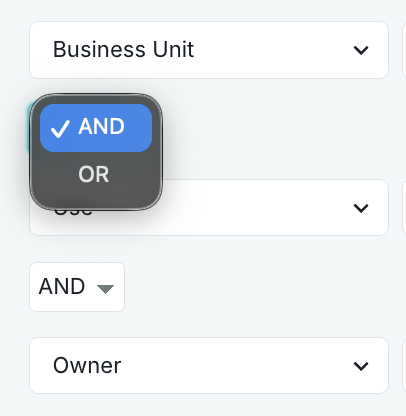
Combinators
Combinators define how multiple rules or groups are logically combined when matching conditions. By default, multiple rules are combined with AND logic, meaning all conditions must match.
Supported combinators:
- AND — All conditions must match
- OR — At least one condition must match
To change the combinator:
Click the AND or OR button between rules or groups to change how conditions are combined.
Click Apply Filters.
View active filters
After applying filters, active filter conditions appear as individual chips next to the label Filtered by:.
- Field names
- Operators
- Values
Remove active filters
Click the icon on any filter chip to remove that specific filter condition. The remaining filters are automatically reapplied.
Examples
Available values depend on your organization’s custom configuration
Show records where Record Field: Risk Level is High (requires that you have a custom select field called Risk Level):
On the Inventory page, click Filter.
Click Add Rule:
- Field =
Record Field: Risk Level - Operator =
equals - Value =
High
- Field =
Click Apply Filters.
Show records that are Stage: In Production AND in Business Unit: Risk Management:
On the Inventory page, click Filter.
On the Select Your Filters dialog that opens, click Add Rule:
- Field =
Stage - Operator =
in - Value =
In Production
- Field =
Add another rule:
- Field =
Business Unit - Operator =
in - Value =
Risk Management
- Field =
Click Apply Filters.
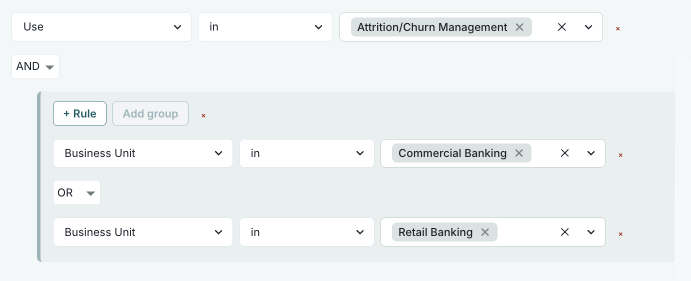
Show records that are (Stage: In Production AND in Business Unit: Risk Management) OR (Stage: In Production AND in Use: Attrition/Churn Management):
On the Inventory page, click Filter.
Click Add Rule to add your rules:
- First rule:
- Field =
Stage - Operator =
in - Value =
In Production
- Field =
- Second rule:
- Field =
Business Unit - Operator =
in - Value =
Risk Management
- Field =
- First rule:
Click Add Group to create a new group:
Change combinator to
OR(between the two groups).In the new group, click Add Rule to add:
- First rule:
- Field =
Stage - Operator =
in - Value =
In Production
- Field =
- Second rule:
- Field =
Use - Operator =
in - Value =
Attrition/Churn Management
- Field =
- First rule:
Click Apply Filters.
Show records where (Stage: Active OR In Periodic Review) AND (Risk Level: High OR Medium) AND Owner: John Doe:
On the Inventory page, click Filter.
Click Add Group to add your groups:
- First group:
- Field =
Stage - Operator =
in - Value =
In Production,In Periodic Review
- Field =
- Second group:
- Field =
Record Field: Risk Level - Operator =
equals - Value =
High,Medium
- Field =
- First group:
Add Rule to add a rule:
- Field =
Owner - Operator =
in - Value =
John Doe
- Field =
Ensure all groups and rules use AND combinator.
Click Apply Filters.
Show records implemented between January 1, 2025 and January 31, 2025:
On the Inventory page, click Filter.
Add Rule:
- Field =
Implementation Date - Operator =
between.
- Enter start date — January 1, 2025
- Enter end date — January 31, 2025
- Field =
Click Apply Filters.
Show records owned by a specific user that have .pdf attachments:
On the Inventory page, click Filter.
Click Add Rule:
- Field =
Owner - Operator =
in - Value = Select the user from dropdown.
- Field =
Add another rule:
- Field =
Attachments - Operator =
file name contains - Value =
.pdf.
- Field =
Ensure the combinator between rules is set to
AND.Click Apply Filters.
Click Save.
(Optional) Click View Records to preview which records match your filter criteria.
How do I filter for groups?
To filter for groups, you first need to define these user groups in your organization’s settings. Then filter using the Group field in the inventory scope.
By default, attestations include the record name. Add additional inventory record fields as needed:
Under Relevant Attestation Fields, drag inventory record fields between columns:
- Inventory Record Fields — Available fields from the inventory
- Relevant Attestation Fields — Selected fields to display in record snapshots
(Optional) Reorder the fields to change how they display in the attestation.
Define the structured fields that submitters fill out as part of the attestation process. Each field becomes a question in the questionnaire and appears as a column in the Responses tab for consolidated reporting.
Under Questionnaires, click Add Field.
Configure the field:
- Field Type — Select the input type:
- Single Line Text
- Multi Line Text
- Checkbox
- Dropdown
- Number
- Date
- Field Label — Enter the question or prompt shown to submitters
- Description — Optional context about the field
- Help Text — Optional guidance displayed to users
- Required Field — Toggle to require submitters to complete this field before submission
- Field Type — Select the input type:
Click Add Field.
Repeat to add additional fields as needed.
(Optional) Reorder fields by dragging them to change the order in which they appear to submitters.
Questionnaire fields are available immediately for new attestation instances. Submitters see structured inputs for each field, and responses are collected consistently across all submissions.
Test attestation schedules
ImportantNot normally required
These steps are optional and not required to set up attestation — perform only under the direction of ValidMind.
For testing purposes only, you can trigger the attestation process:
In the left sidebar, click Settings.
Under Governance, select Attestation Templates and then click the attestation template to test.
Under Attestation Periods, hover over an attestation period.
When the menu appears, select Start Now.
Click Confirm.
After starting the schedule, attestation participants are notified via My Inbox that the attestation is ready to be completed.
Edit attestation periods
In the left sidebar, click Settings.
Under Governance, select Attestation Templates and then click the attestation template to edit.
Under Attestation Periods, hover over an attestation period.
When the menu appears, select Edit.
Make your desired changes to the following:
- Name
- Start Date
- End Date
Click Save Period.
Edits to an attestation period will be effective for future occurrences but do not affect previous or in-progress attestation periods.
Cancel attestation periods
ImportantCanceling an attestation period is permanent
This action cannot be undone. The history of previous attestation periods is unaffected by this action.
In the left sidebar, click Settings.
Under Governance, select Attestation Templates and then click the attestation template to manage.
Under Attestation Periods, hover over an attestation period.
When the menu appears, select Cancel Period.
Click Confirm to cancel the period.
View attestations dashboard
When an attestation period is active or completed, the Attestations item appears in the left sidebar. This dashboard provides a centralized view for tracking, reviewing, and exporting attestation data.
To access the dashboard:
In the left sidebar, click Attestations.
Use the dropdown at the top to select the attestation period to view. You can choose from active periods or view completed historical periods.
The dashboard organizes information across five tabs:

The Progress tab displays a swimlane view of all attestation submissions organized by status:
- Not Started — Submissions awaiting action from submitters.
- In Progress — Submissions currently being completed.
- Ready for Review — Submissions awaiting reviewer action.
- Reviewed — Submissions awaiting approver sign-off.
- Signed Off — Completed submissions.
Click any submission card to view its details, including the questionnaire responses and associated records.
The Responses tab provides a consolidated view of all questionnaire responses across submissions. Each questionnaire field appears as a column, making it easy to compare responses and identify patterns.
Use this view to:
- Review all submissions at a glance.
- Compare responses across different submitters.
- Export responses for compliance reporting.
The Inventory tab shows a snapshot of all records included in the attestation scope at the time the period started. This provides an organization-wide view of the inventory state.
Click any record to view its snapshot details in a modal, which displays the record field values captured at that point in time. Click View Live Data to navigate to the current record.
For completed attestation periods, use the Before and After toggle to compare the record state at the start versus the completion of the period.
The Validation Issues tab shows all validation issues that were open at the time of the snapshot, including:
- Title and artifact ID
- Severity and status
- Associated inventory record
- Risk area, assignee, and due date
The Artifacts tab displays artifacts (findings) captured in the snapshot, organized by artifact type.
Export attestation data
Export attestation data in CSV or Excel format for external reporting and compliance documentation.
Navigate to the Attestations dashboard.
Select the tab containing the data to export: Progress, Responses, Inventory, Validation Issues, or Artifacts.
Click Export in the upper right.
Choose your preferred format and save the file.
Complete attestation periods
When all submissions in an attestation period have been signed off, the period is automatically marked as complete. Administrators can also manually complete a period before all submissions are finished.
ImportantCompleting a period triggers a final snapshot
When a period is completed, the platform captures a final snapshot of all records and artifacts. This enables before/after comparison in the Inventory tab.
To manually complete an attestation period:
In the left sidebar, click Settings.
Under Governance, select Attestation Templates and then click the attestation template.
Under Attestation Periods, hover over an active attestation period.
When the menu appears, select Complete Period.
Click Confirm.
After completing a period, no further actions can be taken on any submissions, regardless of their current status.
Delete attestation templates
Remove attestation templates that are no longer needed. When a template is deleted, all related data including schedules, executions, and snapshots is automatically cleaned up.
ImportantDeletion is blocked for active periods
You cannot delete an attestation template if it has any active attestation periods. Complete or cancel all active periods before deleting the template.
In the left sidebar, click Settings.
Under Governance, select Attestation Templates.
Locate the template to delete and hover over it.
When the menu appears, select Delete.
Click Confirm to delete the template.