Customize document templates
Customize templates for document types to fit your specific case-by-case needs, such as type or complexity of record or record use case.
- Templates are versioned and saving a template after making changes or reverting to a previous version state always creates a new version, or you can duplicate templates to create new independent templates in your library.
- Document templates are stored as YAML files edited directly using the advanced editor, allowing you full control over the minutiae such as desired guidelines.
- We also provide a simplified editing experience to allow you to easily construct and rearrange the outline of your template.
Prerequisites
Edit template outlines
Edit outlines for document templates from Settings or directly on documents:
Editing outlines for document templates from Settings will create a new version of the template that can be applied to documents:
In the left sidebar, click Settings.
Under Documents, select Templates.
Select one of the tabs for the type of template you want to edit:
Click the template to edit and on the template details page, select Edit Outline.
In outline editing mode, you can:
- Expand sections
- Expand the menu for any sections with subsections by clicking .
- Rename sections
-
- Hover over a section until the appears, then click on it to change the name.
- Save by clicking .
- Remove sections
-
- Hover over the section you want to delete.
- When the appears, click on it.
- Click Yes, Delete Section to confirm deletion of that section.
- Reorder sections
- Click and hold firmly to drag to reorder sections.
- Insert new sections
- Click to add a new section or subsection to the template:
- To add a section above the current section, select Section Before.
- To add a section below the current section, select Section After.
- To add a subsection within the current section, select Subsection.
When you’re done, click Create New Version to view a side-by-side comparison of your changes with the previous version:
- Add a description in Version Notes to track your changes.
- Click Save to save the new version.
Once saved, your new template version becomes available for use.
Editing outlines for templates on documents will only apply changes to that document’s active template:
In the left sidebar, click Inventory.
Select a record or find your record by applying a filter or searching for it.12
In the left sidebar that appears for your record, click Documents and select the Latest or Saved Versions tab.13
Click on the document you would like to customize the template outline for.14
On the template details page, click Edit Outline.
In outline editing mode, you can:
- Expand sections
- Expand the menu for any sections with subsections by clicking .
- Rename sections
-
- Hover over a section until the appears, then click on it to change the name.
- Save by clicking .
- Remove sections
-
- Hover over the section you want to delete.
- When the appears, click on it.
- Click Yes, Delete Section to confirm deletion of that section.
- Reorder sections
- Click and hold firmly to drag to reorder sections.
- Insert new sections
- Click to add a new section or subsection to the template:
- To add a section above the current section, select Section Before.
- To add a section below the current section, select Section After.
- To add a subsection within the current section, select Subsection.
When you’re done, click Done Editing to apply your changes to that specific document’s active template.
Add drafting instructions
Drafting instructions tell the drafting agent how to write documents that use the template, such as the audience, the tone or what a section must cover.17 Add them for the whole template, for individual sections, or both.
In the left sidebar, click Settings.
Under Documents, select Templates.
Select the tab for the type of template you want to edit and click the template.
On the template details page, click Edit Template.
(Optional) Above the outline, enter instructions for the whole document under Drafting Instructions.
(Optional) To add instructions for a section, click on the section and select Drafting Instructions. Enter the instructions in the field that appears under the section.
To remove a section’s instructions, clear the field.
Click Create New Version to review your changes, add Version Notes and click Save.
Each field takes up to 4,000 characters. A heading that only groups subsections and has no blocks of its own can’t have drafting instructions. You can also add instructions in the YAML editor with the instructions key, at the top level of the template or on a section.18
Drafting instructions are not available when you edit a template outline directly on a document.
How drafting instructions are used
Documents use the drafting instructions of their template version. To use new instructions on an existing document, switch the document to the new template version.19
- Template instructions — Prefill the Instructions box when you draft a whole document with Draft Document. Once someone drafts the whole document with their own instructions, the box shows those instead.
- Section instructions — Prefill the Instructions box when you draft that section with Draft Section. Once someone drafts the section with their own instructions, the box shows those instead. In a Draft Document run, the section’s instructions apply to that section in addition to the instructions in the box, when its blocks are planned and when it is drafted.
Template instructions don’t prefill Draft Section. You can edit or clear prefilled instructions before you draft. If you clear the box and draft with no instructions, the template’s instructions show again the next time.
Configure assessment options20
20 validation report templates only
Edit YAML templates
In the left sidebar, click Settings.
Under Documents, select Templates.
Select one of the tabs for the type of template you want to edit:21
- Development
- Validation
- Monitoring
- Custom
Click the template to edit and on the template details page, select Edit Raw.
In the Edit Template YAML editor that opens, make your changes according to the template schema,22 including the addition of any shared text blocks from your library.23
Once you’re finished editing, click Continue to view a side-by-side comparison of your changes with the previous version of the template.
On the Review Changes screen:
- Add a description in Version Notes to track your changes.
- Click Save Version # to save the new version.
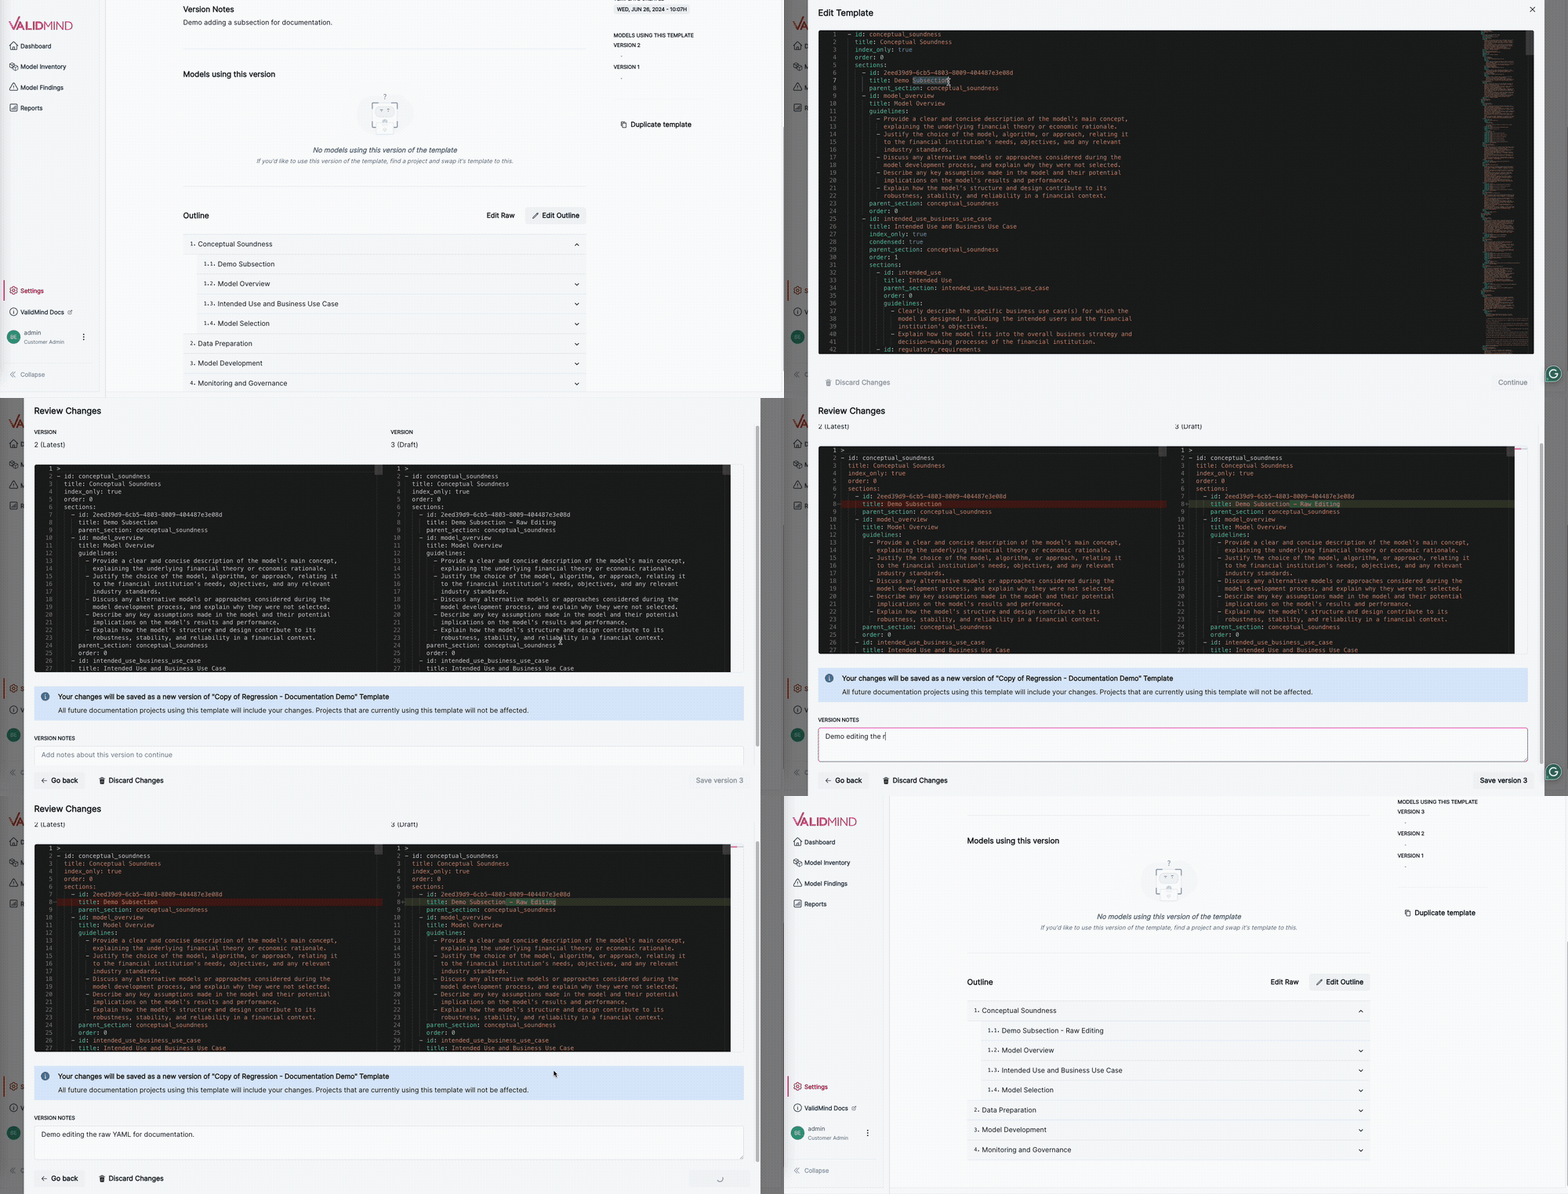
Once saved, your new template version becomes available for use.
Template schema
Top-level documentation sections shown in the template editor.
No Additional ItemsEach item of this array must be:
A section in the document tree.
No Additional PropertiesUnique identifier for the section.
Title of the section.
Description of the section.
Order of the section in the navigation menu. By default sections are ordered alphabetically. If order is specified, sections will be ordered by the order value, and then alphabetically.
Default text for the section. If set, a metadata content row will be created with this text when installing the template on a given project.
If true, the section will be displayed in the navigation menu, but it will not be accessible via direct link.
If true, the section will condense all of its subsections into a single section.
Set by the system when AI-planned blocks are added to a section that had none. If true, exports skip any text stored under the section's own id, which no block shows in the app. Keep it when editing the template.
Documentation or validation guidelines for the section.
No Additional ItemsEach item of this array must be:
Optional drafting instructions for the section. They prefill the section's Draft with AI dialog and apply to the section in a whole-document draft.
Contents to be displayed on the section.
No Additional ItemsEach item of this array must be:
Single content block rendered within a section.
Must be one of:
- "text"
- "metadata_text"
- "dynamic"
- "metric"
- "test"
- "guideline"
- "assessment_summary"
- "unit_metric"
"text"
"test"
ID of the content to be displayed for the given content type.
"sample_text"
No Additional Items
Each item of this array must be:
[
    "sample_text",
    "section_intro"
]
Options for the content block.
{
    "default_text": "This is a sample text block."
}
{
    "metric_id": "metric_1",
    "title": "Custom Title for Metric 1"
}
{
    "test_id": "adf_test"
}
Default text for the content block. Only applicable for text content blocks.
Title of the content block. Only applicable for metric and test content blocks.
Additional Properties of any type are allowed.
Type: objectNested child sections.
No Additional ItemsEach item of this array must be:
Troubleshooting YAML templates
The document template editor validates the YAML changes you make and flags any errors that it finds. If you make a change that the editor cannot parse correctly, the editor will not let you save the changes until you correct the YAML.
Common issues with YAML include incorrect indenting, imbalanced quotes, or missing colons between keys and values. If you run into issues with incorrect YAML, check the error message provided by the template editor, as it might provide a line and column number where the error occurs.
Add text blocks to templates
Add shared text blocks from your library24 to your templates through both the template outline or the YAML editor.
Add text blocks via template outlines
While editing a template outline,25 click on any section of a template that does not have child sections.
Select Text Block.
In the modal that opens, select the reusable blocks you want to add.
Click Insert # Text Block(s) to Document.
Finish editing your template, then save a new version.
Add text blocks via the YAML editor
To add shared text blocks to your templates via the YAML editor:
In the left sidebar, click Settings.
Under Documents, select Block Library.
Select Shared Blocks and click under the right-most column for the block you’d like to insert into a template.
Select Edit Details and review the details for that block.
To the right of the Key, click to copy the key to your clipboard.
With your shared text block’s key copied to your clipboard, open up the editor for a YAML template.26
Under a section or subsection’s
contentsblock sequence,27 insert a sequence item ofcontent_type: textwith yourblock_keynested underoptions.For example:
- id: section
  title: Section
  contents:
    - content_id: shared_block2
      content_type: text
      options:
        block_key: cmg5jb7tw000rgraxmxsavxez
- id: parent_section
  title: Parent Section
  sections:
    - id: subsection
      title: Subsection
      parent_section: parent_section
      contents:
        - content_id: shared_block1
          content_type: text
          options:
            block_key: cmg5m1vru0000ibaxa34pl0wp
Finish editing your template, then save a new version.