Working with analytics
Analytical reports allow you to gain quick insights into your model validation efforts. Reports detail critical artifacts, risk exposure, and compliance status to ensure effective oversight and management of model-related risks.
Typical uses for reports
- Executive summaries — Gain a high-level overview of model validation activities, focusing on critical artifacts and risk exposure.
- Model tracking — Get quick insights into each model’s validation artifacts, highlighting any major issues or deficiencies.
- Compliance review — Find information on compliance with relevant regulatory requirements and internal policies.
- Remediation tracking — See the status of actions taken or proposed to address validation artifacts and mitigate identified risks.
- Risk assessment — Find summaries of the risks associated with each model, including model limitations, model stability and robustness issues, needed model adjustments, and much more.
Reports are primarily designed for model validators or Chief Risk Officers (CROs) who require an understanding of artifacts related to model validation activities.
Prerequisites
Default report pages
The ValidMind Platform provides two default report pages to get you started with analytics:
By default, Models and Validation Issues analytics pages can only be modified by the Customer Admin user role.3
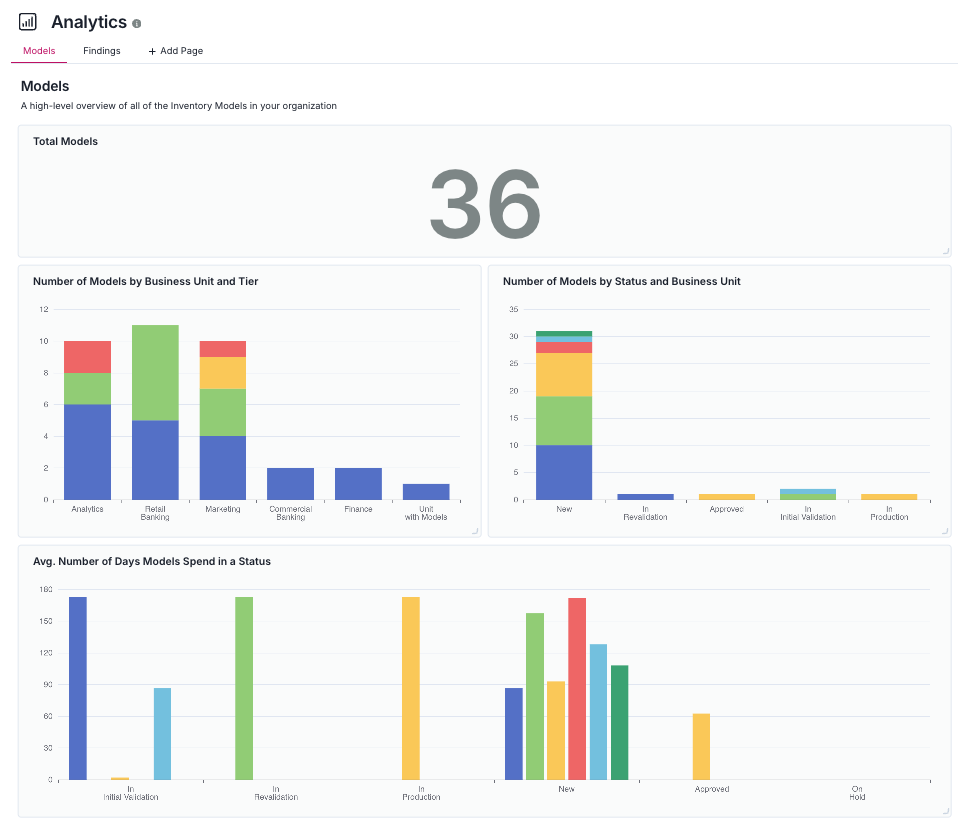
- Total Models
- Count of your total models registered with ValidMind.
- Number of Models by Business Unit and Tier
- Count of your model volume by business unit4 further broken down by risk tier. Assists you in pinpointing where in the organization resources should be concentrated on, along with the materiality of risk that unit may pose based on the models they are responsible for.
- Number of Models by Stage and Business Unit
- Count of your model volume by stage5 further broken down by business unit. Assists you in pinpointing where in the organization resources may need to be focused, based on the progress and severity of artifacts.
- Avg. Number of Days Models Spend in a Stage
- Average count of days your models spend in a certain stage further broken down by business unit. Assists you in pinpointing what point of your model risk management process resources should be concentrated on, along with where in the organization your resources should be allotted to.
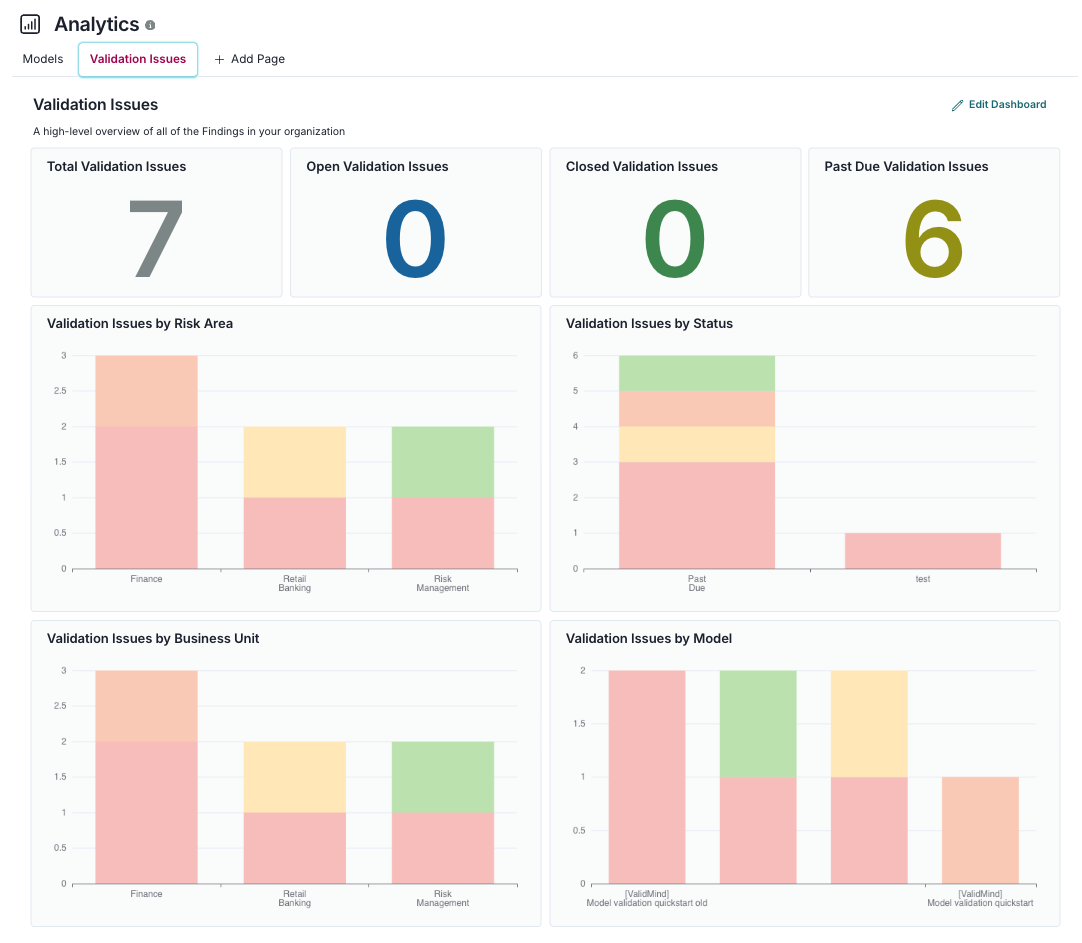
- Total Validation Issues, Open Validation Issues, Closed Validation Issues, Past Due Validation Issues
- Count of your total validation issue type artifacts,6 currently open validation issues, currently past due validation issues, and previous validation issues now closed.
- Validation Issues by Risk Area
- Identifies issues based on the type of risk they pose to the organization, such as model limitations, data quality issues, regulatory compliance, and more. Helps in understanding the risk landscape for your models and risk areas requiring attention or improvement.
- Validation Issues by Status
- Sorts validation issue type artifacts based on their resolution status, such as open, closed, or past due. Provides a snapshot of the validation process, highlighting which issues have been addressed, which are currently being worked on, and which are yet to be tackled.
- Validation Issues by Business Unit
- Segmented according to different divisions or departments within your organization, such as Finance, Marketing, and more. Assists you in pinpointing where in the organization model-related issues are occurring, facilitating more targeted resolution, if necessary.
- Validation Issues by Model
- Specific to individual models, details the validation issue type artifacts for each model, including any errors, limitations, or assumptions that may affect the model’s performance. This helps in assessing the reliability and accuracy of each model.
Arrange report widgets
You can also add any of the report widgets to your personal dashboard.7
Rearrange report widgets on your analytics pages, including your custom pages:8
In the left sidebar, click Analytics.
Click on the tab for the custom reports page you’d like to rearrange.
Click Edit Dashboard.
Hover over the title of a widget until the appears.
Click and drag to position your widget as desired.
To resize a widget, hover over the bottom-right corner of a widget until the appears, then adjust the dimensions to your liking.
Click Done Editing to exit the editor.

