Register records in the inventory
Register records with ValidMind as the first step towards streamlining your organization’s risk management oversight.
Use the ValidMind inventory to track comprehensive details for all your records throughout their lifecycles. The inventory is customizable and extensible, with a layout that can be configured to suit each user’s needs.
In the left sidebar, click Inventory.
Select the type of {Record} you want to view by clicking on {Record} Inventory.2
Use the top buttons to narrow down records and organize the inventory to your preference:
Filtering supports simple and complex conditions using AND or OR logic with nested groups. You can filter on both the default fields created by ValidMind and custom fields created by your organization.
Rules define individual conditions to filter by, such as the business unit or owner.
To add a rule:
Click click Add Rule to add a filter condition.
A filter rule contains three components:

| Text fields | Date fields | Number fields | Boolean fields | Multi-select fields |
|---|---|---|---|---|
| equals | equals | equals | equals | in |
| not equals | not equals | not equals | not equals | not in |
| contains | before | greater than | is empty | contains |
| begins with | after | less than | is not empty | is empty |
| ends with | between | between | is not empty | |
| is empty | is empty | is empty | ||
| is not empty | is not empty | is not empty |
(Optional) Add more rules by following the same steps.
Click Apply Filters.
Groups combine multiple rules that are evaluated together and can be nested one level deep. You use groups for more complex filters, such as Condition A AND (Condition B OR Condition C).
To add a group:
Click Add Group to create a nested group of conditions.
Follow the same steps as in Rules to add one or several conditions to the group.
Click Apply Filters.
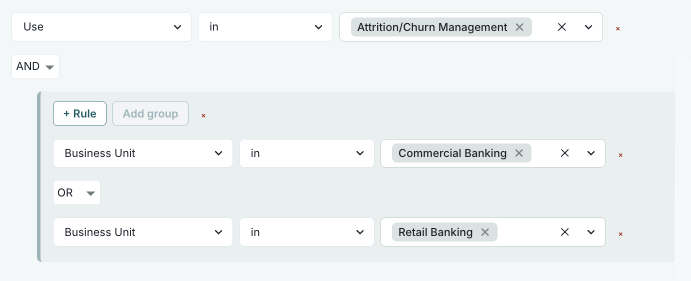
Combinators define how multiple rules or groups are logically combined when matching conditions. By default, multiple rules are combined with AND logic, meaning all conditions must match.
Supported combinators:
To change the combinator:
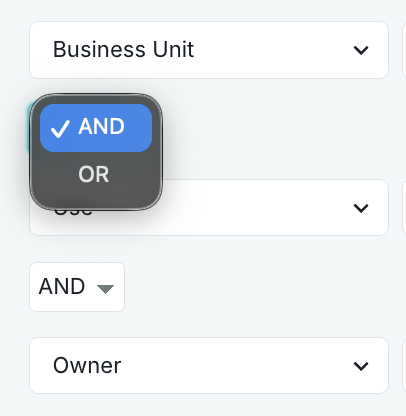
Click the AND or OR button between rules or groups to change how conditions are combined.
Click Apply Filters.
After applying filters, active filter conditions appear as individual chips next to the label Filtered by:.
Click the icon on any filter chip to remove that specific filter condition. The remaining filters are automatically reapplied.
Available values depend on your organization’s custom configuration
Show records where Record Field: Risk Level is High (requires that you have a custom select field called Risk Level):
On the Inventory page, click Filter.
Click Add Rule:
Record Field: Risk LevelequalsHighClick Apply Filters.
Show records that are Stage: In Production AND in Business Unit: Risk Management:
On the Inventory page, click Filter.
On the Select Your Filters dialog that opens, click Add Rule:
StageinIn ProductionAdd another rule:
Business UnitinRisk ManagementClick Apply Filters.
Show records that are (Stage: In Production AND in Business Unit: Risk Management) OR (Stage: In Production AND in Use: Attrition/Churn Management):
On the Inventory page, click Filter.
Click Add Rule to add your rules:
StageinIn ProductionBusiness UnitinRisk ManagementClick Add Group to create a new group:
Change combinator to OR (between the two groups).
In the new group, click Add Rule to add:
StageinIn ProductionUseinAttrition/Churn ManagementClick Apply Filters.
Show records where (Stage: Active OR In Periodic Review) AND (Risk Level: High OR Medium) AND Owner: John Doe:
On the Inventory page, click Filter.
Click Add Group to add your groups:
StageinIn Production, In Periodic ReviewRecord Field: Risk LevelequalsHigh, MediumAdd Rule to add a rule:
OwnerinJohn DoeEnsure all groups and rules use AND combinator.
Click Apply Filters.
Show records implemented between January 1, 2025 and January 31, 2025:
On the Inventory page, click Filter.
Add Rule:
Implementation Datebetween.Click Apply Filters.
Show records owned by a specific user that have .pdf attachments:
On the Inventory page, click Filter.
Click Add Rule:
OwnerinAdd another rule:
Attachmentsfile name contains.pdf.Ensure the combinator between rules is set to AND.
Click Apply Filters.
To narrow the inventory to records that share a value you can already see in the table, filter from the cell itself instead of opening the filter panel:
Hover over a cell in the inventory table. A icon appears at the right edge of cells whose column supports an equals filter.
Click the icon. A rule of the form field equals this value is added to your current filters, the listing refreshes, and the rule appears as a chip in the filter bar like any other filter.
To remove the filter, remove its chip or click Clear All Filters in the filter panel.
Keep in mind:
Calculation and Aggregation fields4 appear in the field selector alongside your other custom fields. The operators follow the value the field produces: a calculation with a Number result type or a COUNT aggregation offers number operators, a Date result type or a MIN or MAX aggregation offers date operators such as before, after, and between, and a Text result type offers text operators.
These values are stored on each record and refreshed in the background rather than recalculated when you filter. When a rule uses one of these fields, a notice next to the applied filters names the field and reports whether its values are up to date. If they are not, the notice shows how old the oldest stored value is and when the next automatic refresh runs.
Two additional operators check the stored value itself:
ERR: in the list. Offered on every Calculation and Aggregation field.Published inventory segments can also use these fields in their conditions.5 Attestation inventory scopes cannot.
Changes are automatically saved and affect only your account. To reapply a combination of columns, filters, sorting, and grouping later on, save it as a view.6
Group records to organize the table view into collapsible sections based on the value of a single field, with a record count for each section:
In the left sidebar, click Inventory.
Select the type of {Record} you want to view by clicking on {Record} Inventory.8
Click Group By. To use this feature, make sure you’re in table view.9
Select the field to group by:
Once grouped, the applied field appears as a Grouped by chip alongside your active filters, and you can work with the grouped listing:
Grouping is included when you save a view, so you can reapply the same grouped layout later or share it with your organization.11