Manage artifact segments
Save a set of artifact filters as a named, reusable segment that spans every artifact type, then publish the segment so everyone in your organization can view, filter, and analyze the matching artifacts together.
Prerequisites
Key concepts
Artifact segments are named, reusable filters over your artifacts, built the same way as inventory segments:3
- A segment spans every artifact type in your organization, including validation issues. Artifact Type is available as a condition, so you can scope a segment to specific types.
- Segment conditions use the fields that every artifact type shares. Severity, Assignee, Risk Area, and Due Date count as shared fields only while every active artifact type has them switched on.4 If an artifact type is added or reconfigured later so that a saved segment no longer fits the shared fields, the segment is refused with a message wherever it is used until its conditions are updated.
- Matching artifacts are evaluated live. A segment always reflects the current state of your artifacts, and users only see the matching artifacts they have permission to view.
- A segment starts as a personal Draft. Publishing it makes it available to your entire organization.
Add segments
In the left sidebar, click Settings.
Under Artifacts, select Artifact Segments.
Click Add Segment.
On the Add New Segment dialog that opens, enter the Segment Name and an optional Description.
Click Add Segment.
The detail page for your new segment opens, where you define the segment conditions.
Define segment conditions
On your segment’s detail page, click Filter.
On the Edit Segment Conditions dialog that opens, enter the conditions that artifacts must match to belong to the segment:
- Artifact Type is available as a condition, so you can scope a segment to specific artifact types.
- Only the fields shared by every artifact type are offered. Fields of the parent inventory record and Segment are not available as conditions here.
- Shared Calculation fields can be used as conditions. They are evaluated against the stored values, which refresh in the background, and they offer the same operators as in the artifact filters, including has error.8
Filtering supports simple and complex conditions using AND or OR logic with nested groups. You can filter on both the default fields created by ValidMind and custom fields created by your organization.
Rules
Rules define individual conditions to filter by, such as the business unit or owner.
To add a rule:
Click click Add Rule to add a filter condition.
A filter rule contains three components:

- Field selector
- Dropdown to choose the field type to filter by.
- Operator selector
- Dropdown to select the comparison operator.
- Value editor
- Input area that varies based on the selected field type.
- From the field selector dropdown, select one of:
- artifact information — One of the artifact fields always created by ValidMind, such as the Business Unit.
- assignees — User assigned to the Validation Issue type artifact.
- artifact fields — One of the organization-specific artifact fields you added for your own use.
- inventory record fields — Fields of the parent inventory record that the artifact type is configured to display, such as the record’s Stage.
- segment — A published artifact segment: a named, reusable filter managed by your organization’s administrators. Available on artifact listings, and not offered inside a segment’s own conditions.
- From the operator dropdown, select one of:
Available operators update based on the field selector
| Text fields | Date fields | Number fields | Boolean fields | Multi-select fields |
|---|---|---|---|---|
| equals | equals | equals | equals | in |
| not equals | not equals | not equals | not equals | not in |
| contains | before | greater than | is empty | contains |
| begins with | after | less than | is not empty | is empty |
| ends with | between | between | is not empty | |
| is empty | is empty | is empty | ||
| is not empty | is not empty | is not empty |
- From the value editor, enter or select a value based on the field type:
Value input changes based on field selector
- Text
- Text input or text area for longer content
- Date
- Date picker
- Number
- Number input or range slider
- Boolean
- Checkbox
- Select/multi-select
- Dropdown with search
- Entity fields
- Dropdown with search for users or records
(Optional) Add more rules by following the same steps.
Click Apply Filters.
Groups
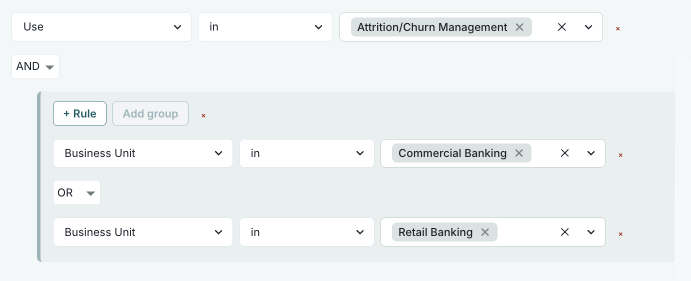
Groups combine multiple rules that are evaluated together and can be nested one level deep. You use groups for more complex filters, such as Condition A AND (Condition B OR Condition C).
To add a group:
Click Add Group to create a nested group of conditions.
Follow the same steps as in Rules to add one or several conditions to the group.
Click Apply Filters.
Combinators
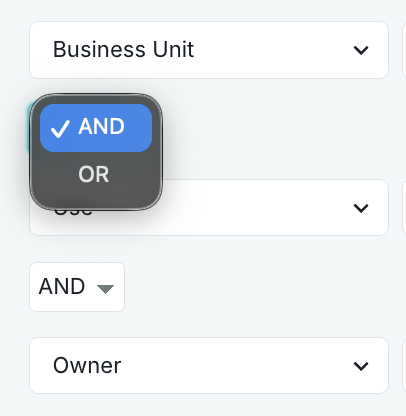
Combinators define how multiple rules or groups are logically combined when matching conditions. By default, multiple rules are combined with AND logic, meaning all conditions must match.
Supported combinators:
- AND — All conditions must match
- OR — At least one condition must match
To change the combinator:
Click the AND or OR button between rules or groups to change how conditions are combined.
Click Apply Filters.
View active filters
After applying filters, active filter conditions appear as individual chips next to the label Filtered by:.
- Field names
- Operators
- Values
Remove active filters
Click the icon on any filter chip to remove that specific filter condition. The remaining filters are automatically reapplied.
Examples
Available values depend on your organization’s custom configuration
Show records where Record Field: Risk Level is High (requires that you have a custom select field called Risk Level):
On the Inventory page, click Filter.
Click Add Rule:
- Field =
Record Field: Risk Level - Operator =
equals - Value =
High
- Field =
Click Apply Filters.
Show records that are Stage: In Production AND in Business Unit: Risk Management:
On the Inventory page, click Filter.
On the Select Your Filters dialog that opens, click Add Rule:
- Field =
Stage - Operator =
in - Value =
In Production
- Field =
Add another rule:
- Field =
Business Unit - Operator =
in - Value =
Risk Management
- Field =
Click Apply Filters.
Show records that are (Stage: In Production AND in Business Unit: Risk Management) OR (Stage: In Production AND in Use: Attrition/Churn Management):
On the Inventory page, click Filter.
Click Add Rule to add your rules:
- First rule:
- Field =
Stage - Operator =
in - Value =
In Production
- Field =
- Second rule:
- Field =
Business Unit - Operator =
in - Value =
Risk Management
- Field =
- First rule:
Click Add Group to create a new group:
Change combinator to
OR(between the two groups).In the new group, click Add Rule to add:
- First rule:
- Field =
Stage - Operator =
in - Value =
In Production
- Field =
- Second rule:
- Field =
Use - Operator =
in - Value =
Attrition/Churn Management
- Field =
- First rule:
Click Apply Filters.
Show records where (Stage: Active OR In Periodic Review) AND (Risk Level: High OR Medium) AND Owner: John Doe:
On the Inventory page, click Filter.
Click Add Group to add your groups:
- First group:
- Field =
Stage - Operator =
in - Value =
In Production,In Periodic Review
- Field =
- Second group:
- Field =
Record Field: Risk Level - Operator =
equals - Value =
High,Medium
- Field =
- First group:
Add Rule to add a rule:
- Field =
Owner - Operator =
in - Value =
John Doe
- Field =
Ensure all groups and rules use AND combinator.
Click Apply Filters.
Show records implemented between January 1, 2025 and January 31, 2025:
On the Inventory page, click Filter.
Add Rule:
- Field =
Implementation Date - Operator =
between.
- Enter start date — January 1, 2025
- Enter end date — January 31, 2025
- Field =
Click Apply Filters.
Show records owned by a specific user that have .pdf attachments:
On the Inventory page, click Filter.
Click Add Rule:
- Field =
Owner - Operator =
in - Value = Select the user from dropdown.
- Field =
Add another rule:
- Field =
Attachments - Operator =
file name contains - Value =
.pdf.
- Field =
Ensure the combinator between rules is set to
AND.Click Apply Filters.
Click Apply Filters.
Your conditions appear as chips next to Filtered by, and the list of matching artifacts updates live along with the matching artifact count.
In the page header, click Save Changes to save the conditions to the segment, or Cancel to discard your edits.
A published segment is evaluated live wherever it is used, including the Artifacts listing, artifact filters, and analytics datasets. When you save condition changes to a published segment, confirm the change by clicking Yes, Save Changes.
Publish segments
Publishing makes a segment available to everyone in your organization. You can continue editing a segment after it is published.
In the left sidebar, click Settings.
Under Artifacts, select Artifact Segments.
On the actions menu for your segment, click Publish Segment.
Click Publish Segment to confirm.
Each segment shows one of the following statuses:
| Status | Description |
|---|---|
| Draft | Personal to you, visible only to you and not yet offered where segments are used. |
| Published | Available to everyone in your organization. |
| Archived | Permanently retired. An archived segment cannot be edited, published, or restored. |
Edit segments
To rename a segment or update its description:
In the left sidebar, click Settings.
Under Artifacts, select Artifact Segments.
On the actions menu for your segment, click Edit Segment.
Update the Segment Name or Description, then click Save Changes.
To edit the conditions of a segment, open the segment and update its filters.9 To see the artifacts a segment currently matches, select View Matching Artifacts on its actions menu.
Unpublish, archive, or delete segments
Archiving and deletion of segments are permanent.
In the left sidebar, click Settings.
Under Artifacts, select Artifact Segments.
On the actions menu for your segment, click one of:
- Unpublish Segment — Returns the segment to a personal draft. The segment is no longer offered where segments are used. Click Yes, Unpublish Segment to confirm.
- Archive Segment — Permanently retires the segment. An archived segment cannot be edited, published, or restored. Click Yes, Archive Segment to confirm.
- Delete Segment — Permanently deletes the segment. The artifacts it matched are not affected. Click Yes, Delete Segment to confirm.
View a segment as the Artifacts scope
Once a segment is published, anyone in your organization can open it as the scope of the Artifacts listing and work with every matching artifact across artifact types:
In the left sidebar, click Artifacts.
Click the page title to open the scope selector. Options are grouped under Artifact Type and Segments.
Select a segment.
The listing shows every matching artifact you have permission to view, across all artifact types, with the shared fields as columns plus an Artifact Type column. Filter, Group By (including by Artifact Type), sorting, and CSV export are available on the shared fields.
Switching between an artifact type and a segment resets the filters, sorting, and grouping, and the listing remembers your last selected scope. Saved views are not available in segment scope. If a segment you open is no longer available to you, for example because it was unpublished or deleted, the listing tells you so and returns to the artifact type view.
Apply segments as artifact filters
Within a single artifact type’s listing, a published segment can also be used as a filter rule:
In the left sidebar, click Validation Issues or Artifacts, and select the artifact type to filter.
Click Filter.
Click Add Rule, then select Segment from the field selector.
Select one or more segments to filter by, and combine the rule with other conditions as needed.10
Click Apply Filters.
Use segments in analytics
Published artifact segments are available as datasets for visualization widgets on your analytics pages, listed under Artifact Segments in the dataset selector.11 A widget built on a segment can be grouped by Artifact Type, and clicking a chart section opens the Artifacts listing in that segment’s scope with the matching artifacts.